
There’s been a lot of discussion about inexpensive alternatives to buying two way mirrors. After seeing Larry Lund’s page and instructions for his Bottomless Pit, I decided to build one. After finding out that a 2′ by 2′ two way mirror would cost $55, I wanted to find an effective and less costly alternative. From the posts I had read I saw that some list members had built pits using mirror paint or film on Plexiglas to create their own versions of the Bottomless Pit. Spookdawg had done this and had pictures of the Pit online. After visiting Spookdawg’s page, I decided to give it a try. So with many thanks to Larry Lund and Spookdawg for their examples and their invaluable advice, here are pictures of my version of Larry Lund’s Bottomless Pit.
Material list: (This is the same list as found on Larry Lund’s page with some exceptions. I used 1/2″ thick foam and instead of a 2 way mirror I used 1/4″ Plexiglas and Privacy Mirror Film.
- 2 10′ 2″ x 4″ (these must be very straight and will be used for the mirror supports)
- 1 4′ x 8′ sheet of 3/8 CDX plywood ( for the walls )
- 1 2′ x 2′ mirror (1/8″ plate mirror)
- 1 2′ x 2′ 2-way mirror
Alternately:*
- 2′ by 2′ 1/4″ piece of PlexiGlas
- Roll of Gila Privacy Mirror Film (This was also used by Spookdawg)
- Bottle Gila Film aid which is like a glass cleaner for the Gila film.
- Squeegee
- 2 2′ x 8′ x 1/2″ foam insulating panels (to make fake stones, I used the blue kind from Lowes)
- 1″ X 2″ pine for brackets
- Screws
- 1 100W light bulb and socket.
- 2 tubes of Liquid Nails construction adhesive.
- 1 Quart latex paint (Paint with solvents can damage the foam)
Tools Required:
- Router or table saw to cut the grooves for the mirrors
- Screwdriver
- Drill and bits
- Paint brushes
- Band saw or saber saw
- A dust mask (Important!)
I have finally completed the exterior of my pit and as a result, I’ve changed some text and some steps around. The original issue was how well would this pit work without a 2 way mirror and I have plenty of pictures and a separate section to answer that.
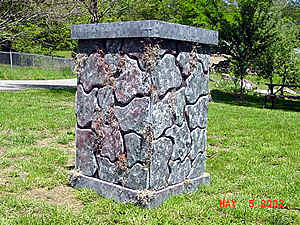
Here is the pit completed. I added a lot of touch up to it to make it look like something that’s actually been outside for a while. I used a ot of vines and moss on the outside. They can be seen more clearly on the larger picture.

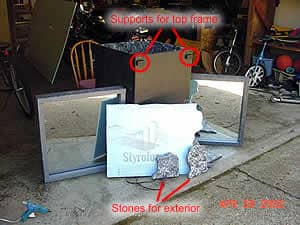
Here’s a picture of the unit assembled but still waiting for the exterior stones to be attached. The L brackets were needed to pull the sides in straight and are hidden once the faux rocks are applied. Each corner has 3 brackets.

This is the 3/8″ plywood for the sides and 1/2″ extruded foam for what will be the stones. I had intended to use 3/8″ foam like Larry’s instructions called for but Lowes only had 1/2″ so I made do with 2 sheets of that.
The one sheet of plywood was sufficient for all four sides of the pit.

Here is one of several side by side comparisons of a regular mirror and the Plexiglas with the privacy film. I included this to show that there is a definite tint difference between the two. Since they aren’t going to be displayed side by side, it really doesn’t matter too much. The inside of the pit will appear slightly darker than it would if a regular 2 way mirror were used but it is totally functional.