
After performing numerous tests and experimenting I finally found a way to really get the sprinkler valve to seriously bark. The result is what I nick named the concussion cannon, since you don’t just hear this one, your whole body can feel the concussion created by the large amount of air this dumps out all at once. Here’s how I did it.
The Valve
The valve used in my tests and subsequent gaggle of cannons that I made later were Lawn Genie 1″ Anti-Siphon from the local hardware store.
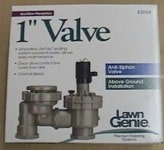
You can find valves that cost a couple of bucks less, but I have been told that they will wear out quickly, so it’s best to go with a name brand such as this or Toro.
Supply List
- (1) 12″ length of 2″ galvanized pipe
- (1) 2″ galvanized pipe end cap
- (1) 1″ to 2″ galvanized pipe reducer
- (1) 3/4″ to 1/2″ galvanized pipe reducer
- (1) 1/4″ IID male air coupler
- (2) 1″ threaded pipe nipple (close)
- (1) 3/4″ threaded pipe nipple (close)
- (1) 1″ galvanized pipe T fitting (1/2″ side outlet)
- (1) 1/2″ to 1/4″ galvanized reducer bushing
- (1) 12 volt transformer
- (1) 6′ extension cord
- (2) 18 ga. crimp cord fittings
- (2) 1/4″ female quick slide, 18 ga. crimp cord fittings1/4″
- (1) 1″ anti-siphon sprinkler valve
Overview
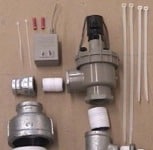
Here’s a quick look at the pieces needed to complete this build, laid out largely how they will need to be assembled.
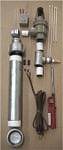
I am using a single-shot sized cylinder here, but if you are planning to trigger your cannon more than once per cycle you can increase the 2″ fittings and pipe to 3″ and easily support two or more rapid succession blasts. Shown here is the lighter you will need for the heat shrink tubes that will be covering the connections you will be making to your transformer, but other than that you will need a hacksaw or jigsaw or chop saw (any one will do), 2 monkey wrenches, a crescent wrench, a die grinder and a electrical crimping tool. All in all, this project should take you about 1 hour to complete. Let’s get to it!
The Build
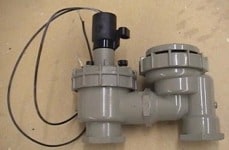
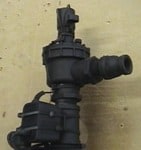
The shape of an anti siphon valve will give us a right angle exhaust to the inlet which makes our cannon very easy to use and to mount on the back side of walls with just the exhaust tip sticking out the other side. But first we will need to remove the unnecessary backflow device which can be done with a chop saw or jig saw as shown. Just cut between the two sides, just forward of the octagonal wrench fitting.

It’s true, the sprinkler valve has been used for some months now for air cannons, but they produce a hollow, almost “honking” sound which is loud, but not very desirable. So once I built my prototype I hoped I could come up with a modifier to this report. What I ended up with was a surprising reduction in the exhaust port (more on this later) that we will need to attach to the valve and in this section we will create our own thread tapping tool for making this possible.

Since this size tap can be very spendy and I don’t need to cut threads into steel, I make my own with a short (close) 3/4″ threaded pipe fitting. In the photo above you can see where I have inserted the fitting into a larger reducer fitting just to use as a handle (I prefer using a T fitting as a handle, but didn’t have one handy at this time) as I prepare to make the tap. Then the end remaining I used a die grinder to cut slots across the threads in 4 places, about 1/2″ up.

Notice I have the grinder on an angle to the fitting so that the slots will create sharp front edges to the threads which I will need to cut into the plastic and route the shavings to the inside of the fitting, away from our new threads. Prior to this, I also ground down the threads of the fitting back about 1/2″ on a taper. The very end threads are ground off, making it small enough to insert into a 3/4″ hole such as we have in the exhaust of our sprinkler valve.
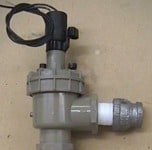
Once you have threaded the port for a secure fit, apply plumber’s tape on a close 3/4″ threaded fitting and then to the other end attach a 3/4″ to 1/2″ reducer. I know this sounds odd to reduce the exhaust instead of enlarge it like a megaphone as we did with the $20 Air Cannon, but I tested many combinations of different devices to come up with this fix to the sound of the sprinkler valve, and this does a wonderful job! And more importantly, this expansion chamber produces an amazing concussion that you can feel all the way through your body! Apparently the back pressure created by the smaller port at the end of the short chamber area super charges the rush of the air at the final moment of escape, creating this chilling effect.
Next, let’s get our air cylinder together.

Be sure to use teflon plumber’s tape on all the threads of the fittings and make sure all of your connections are very tight, as this will be under high pressure.
Attach the end cap to one end of the pipe and the reducer to the other. Then once you assemble the two close 1″ threaded fittings to each end of the T fitting, install the air nipple and 1/4″ to 1/2″ reducer to the right angle of the same. Screw this in tight to the 2″ to 1″ reducer as seen here. Now it is a matter of screwing the sprinkler valve down to this assembly as shown here just prior to installing the expansion chamber to the exhaust.


Now we will need a way to trigger our valve and here is one way to achieve this. Of course you could easily hook up a couple of 9 volt batteries to the valve and that would certainly work, but I like the convenience of 110V myself, so I went to the thrift store and picked up a 12 volt transformer for .60 cents and lopped off the power cord.

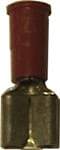
I attached these two wires to the ones coming out of the cap of the valve with two crimp fittings shown in this photo on the left. If you look very closely at the two prongs on the transformer you can see I have shortened them with my die grinder, and I also trimmed them slightly smaller so my 1/4″ female quick slide electrical fittings would slip right on to them.
I then clipped off the female end of my extension cord and attached the two connectors as shown on your right to each one and plugged them into the transformer. I simply used heat shrink tube to cover both of the legs and zip-tied the cords to the throat of the cannon. Then I used two heavy zip ties to attach the transformer to the side of the T fitting as shown here. If you look close you can see I used two more smaller ties, one on each side to keep the first ones from sliding off. This makes my cannon fully contained, and easy to transport.
The amount of ON time that the cannon requires is obviously very very short, like 1/10th of a second or so. Due to this I realize that trigging really needs to be an actor-controlled thing, rather than automating. For ease of use and flexibility I tried using a wireless remote control unit used for light switches, but found that there is a complication with triggering an electric transformer this way and it would not work. For some reason the transformer is supplied a trickle of power even when the remote is not being activated, so the valve stays slightly open. So a really simple fix (and really CHEAP at $2 each) I found for this is to mount a power strip close enough to the cannon to plug it in, and use the reset switch as an on and off trigger.

This worked great all night last Halloween at the charity haunt I was working at where we were using 4 cannons throughout the evening. And these were highly effective startle props! We used ours at 60 PSI and the concussion was very heavy. I doubt you would want to run them at any higher pressure, as it may actually be dangerously too loud!