


A few years ago I created my own version of the Crypt Keeper and this year he benefited from a new head that allows him to speak to the victims with his mouth synchronized to the words. So with the exciting new change I felt he deserved a better seat in which to address the TOTs. I first saw a Death Chair on the Obsessions website and decided something similar to his version would be perfect. Here’s how I did it.

Here is the Cad drawing and schematic for our project. You will need to reference this drawing the entire way through the building phase, so you would be well advised to print this out in as clear format as possible. The entire construction of our chair is 3/4″ plywood with a couple of little sticks of 3/4″ solid wood and 1/4″ plywood. The reason we will be building this out of plywood is because the seat box that will hold the boom box for the voice of the Crypt Keeper is frenched in to the legs and achieving this with 4 x 4s would be very difficult. Here is the cutout and materials list;
ALL 3/4″ VENEER;
(1 Sheet Plywood Needed)
2) 3 63 LEG
2) 2 1/4 63 LEG
2) 2 1/4 45 LEG
2) 1 1/2 45 LEG
4) 2 1/4 8 LEG
4) 1 1/2 8 LEG
2) 2 1/4 5 LEG
2) 1 1/2 5 LEG
2) 3 23 LEG
2) 2 1/4 23 LEG
2) 3 19 1/2 ARM
4) 2 1/4 19 1/2 ARM
2) 1 1/2 19 1/2 ARM
1) 19 43 BACK
-SEAT BOX-
2) 20 1/4 23 1/2 TOP
2) 8 1/2 20 1/4 SIDE
2) 3 8 1/2 BACK
1) 8 1/2 16 (DOOR)
1) 10 23 1/2 FRONT
-OR FOR FACE FRAME-
(2) 4 5/8 10 STILE
(2) 2 1/4 15 RAIL
1) 1″ 8″ DOOR STOP
SPEAKER FRAME;
(3/4″ Solid & 1/4″ plywood)
6 1/8 X 14 7/8;
2) 3/4 X 3/4 X 15 RAIL (solid)
2) 3/4 X 3/4 X 4 3/4 STILE (solid)
2) 1/4 X 1/2 X 14 1/2 PLATE (ply)
2) 1/4 X 1/2 X 4 3/4 PLATE (ply)
SPEAKER FABRIC;
( Black Double Knit)
1) 8 17
2) HINGES, FULL OVERLAY, SELF CLOSING
1) SMALL CAN SILVER PAINT (NON AEROSOL)
1) CAN BLACK VINYL PAINT
4) CANS GLOSS BLACK PAINT
2) CANS WOOD SANDING SEALER
4) CANS CLEAR HIGH GLOSS LACQUER
1) 100 COUNT BAG 3/8″ MUSHROOM WOOD BUTTONS
1) RESIN STATUETTE
4) BLOWN PLASTIC SKULLS
4) BAGS O BONES (BLOWN PLASTIC)
9) MINIATURE RATS
1) LARGE PLASTIC BAT
3) LARGE PLASTIC SPIDERS
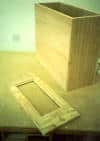
We will be starting our project by building the seat to our chair. We want the front to be ported so, as we mentioned a moment ago, we can put a boom box inside and the sound will travel through. Since we don’t want anyone to see the boom box inside between the CK knees, we’ll need to cover this opening with speaker fabric. First construct your box using the above dimensions from the cut out list. The finished size of the seat will be 10″ high, 23 1/2″ wide and 21″ deep. Our sides and top and floor will be cut out at 20 1/4″ deep because we are making an overlay face frame for it out of 3/4″ material, thus achieving 21″ depth when completed. Above is the box and face frame before they are attached. In my case, I am set up to style and rail the four pieces of the face frame together, giving me a perfect notch in the back (face frame is shown face down here) to hold my speaker fabric later. In your case, you may want to simply cut a piece of plywood 10″ x 23 1/2″ and cut out an opening in it that is on center, 5 1/2″ high x 14 1/4″ wide. Then you can notch the back out with a 3/8″ rabbit bit for the speaker cover to fit into. After you glue and nail the face frame or piece of plywood to the front of your box, sand the edges of the frame flush with the box. For now we will leave the back of the seat open but later we’ll show you the two pieces that will frame out the opening for the door.
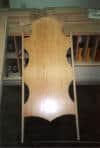
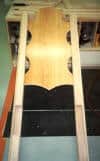
First we will cut out the shape of our back carefully following the dimensions shown on the CAD drawings. Then you will attach this to the inside upper sections of wood we will be using to complete the back legs of the chair. It is important that both leg components are attached level to each other approximately 2 1/2″ inches above the highest cutout. I recommend to glue and screw the back on with 2″ drywall screws.
Here is the rest of the pieces that make up the rear legs minus the upper and lower inside pieces. Note there is a an 8″ piece at the floor, then a 10″ clear section for the seat box to slide into, then the long piece that finishes to the top of each leg. You can attach the lower inside pieces now or after the back sections are attached. Glue and finish nail these pieces as you did the seat box. Finally we attach the back assembly to the rest of the legs. This means that the screws that attach your back to the legs will be covered permanently, so make sure the screws are tight.
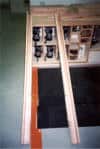
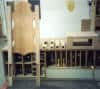
The front legs are made the same way as the rear. The bottom section is 8″ high, a 10″ open gap for the seat box and then the upper 5″ section finishes it out. Make sure you make a left leg and a right leg while assembling! The arms are assembled the same way as the legs without a gap. Here is what all your pieces look like prior to making them into a functioning chair.
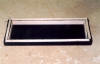
Here are the parts to the speaker cover that will cover the opening of our seat box. As you can see, the frame has already been assembled to the desired size of 6 1/8″ high by 14 7/8″ wide. This is simply a 3/4 x 3/4 solid wood frame that has been glued at the joints with one screw to attach each corner. You will need a section of black double knit fabric that is at least 8″ x 17″. Now we will lay the frame on the fabric and fold the fabric over one side and place one of the 1/4″ plywood strips on top to sandwich the fabric between and then staple the strip to the frame. Now pull the fabric tight to the opposite side of the frame and repeat the process making sure the fabric is pulled tight with no wrinkles of any kind on the opposite side. Repeat for each end. Here is your cover all completed. You can see that the excess fabric has been cut away using a razor blade. Now we will move on to the door.
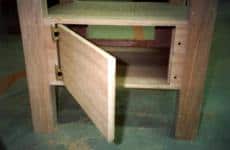
We are skipping ahead slightly with the photo progression to show you where to place your two 3″ x 8 1/2″ pieces of plywood at the back of your seat box to frame an opening for your door. This will leave you an opening of 8 1/2″ x 16″ for your door. If you look closely you will see also another 1″ x 8″ piece of plywood that is on the inside of this opening on the right that will keep the door from swinging inside the box. The door stop is overhanging by only 1/4″, leaving 3/4″ inside to screw to the box to secure it. I just screwed through the back of the box into the stop to attach here. You will then attach the door with two self closing full overlay door hinges to the left side. Now we are ready to construct the chair.
It’s pretty simple to assemble the chair once all the details of construction have been done. You will put some white or yellow woodworker’s glue in the opening of each leg and nail through each leg into the box. Be sure your chair is sitting on a flat level surface before nailing on the last leg to make sure it is plumb and will not rock. Then measure up from the floor 23″ high on the back legs and attach the back of your arms. I used pocket bores under the arms to toenail the arm to the leg, using some glue in the joint as well. You could even toenail this on with finish nails. The front of each arm attaches to the front legs with two screws down through the bottom surface of the arm into the front section of the leg. Don’t worry what they look like, as this opening will be fully covered.
The next thing we will do is belt sand divots in the edges of the arms, legs and seat box to give this a gothic look. Use your own discretion on this but remember to leave your edges square where your skulls will mate to the chair as well as where your bones will be placed. I outlined in pencil where each bone would be placed before sanding my divots so they wouldn’t interfere with attachment. Next glue on 3/8″ mushroom buttons to the back and the front and sides of the seat box to outline these flat, boring areas. Place them about 3″ to 4″ apart and use woodworker’s glue (yellow glue offers a stronger bond than white glue) rather than hot glue for a very strong adhesion. Hot glue if you are in a hurry. You will need approximately 72 buttons. Next we will coat the entire chair with a sanding sealer so the paint we will apply later will not just soak right in and disappear. Once it is dry, sand with 200 grit sandpaper to smooth the top surface.

You can purchase four plastic skeletons for this next step or buy 4 separate skulls and four ‘Bag of Bones’ that has the necessary number of bones you will need. You will need 12 bones (split length wise in half) four skulls, 4 hands (split), & two feet (left and right). I used a utility knife to split the bones down the seem and then flattened out the cut to level with the help of an edge sander (owning a woodworking shop can have its benefits) you can set up a belt sander in a vise to achieve the same effect however. The more level your edges are on each bone, the better bond you will have to the chair.
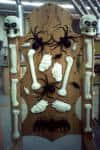
Here is a look at the chair fully outfitted with all the gross things we will want to paint black and highlight. Each skull had to be cut out carefully to perfectly slip over the top of each leg. Then one small screw was used on each side of the skulls’ jaw to attach them to the chair. You would be wise to purchase one extra head to establish the exact pattern of this cut, as it is pretty confusing at first as to where to cut out the plastic so they will fit without having lots of gaps or disfiguring the shape of them once attached. On my chair are 24 half bones, 4 skulls, 2 feet, 8 half hands, 1 rubber bat, three rubber spiders and 9 miniature rats. At the very end of our project I will be gluing on a plastic resin statuette to the top of the back. Use your imagination and I’m sure you can come up with an even better combination. I attached all of my gross things with hot glue. At first I fiddled with a two part epoxy and that seemed to REALLY hold WELL, but after using a $5 syringe within the first three bones, I decided I could live with the relatively weaker adhesion of hot glue, but then wound up going back later and attaching each one with drywall screws because they can get knocked off too easily without it.
The resin statuette was sanded down almost half way through on the back to make it possible to glue to the top of the chair’s back. I then placed it where I will want it and took a careful outline of it so I would know where not spray paint later, as I need to have a strong surface to glue it to so it will hold securely. All of the items I have glued to the chair that are made out of plastic need to be primed with a vinyl paint so the finish won’t flake off during use. After this was dry, I sprayed the entire chair with two coats of black paint.

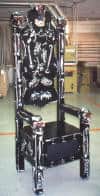
Next, I used a tiny can of silver paint (not aerosol) and a 1″ wide foam brush to drag across the strong edges of the entire chair, buttons and bones to highlight and define. This takes so little paint that the can (maybe 4 ounces) didn’t even look used when I was done, so you won’t need much. Then I painted in the eyes and dripped blood red paint from the mouth of each skull. Once dry, the entire chair was coated in two coats of thick lacquer to protect the finish. Finally I hot glued the statuette to the back of the chair.
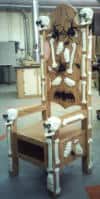
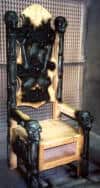
Here is what the chair should look like when complete. The last detail now was to hold the speaker cover inside the seat box with a couple of metal L brackets that were bent to just fit over the frame on the inside and then screwed to the face frame. As you can see, this construction is an advanced woodworker’s specialty, but with as clear directions as we have set out here, even a novice should be able to achieve a really nice finished product. I wish the photo above would have turned out better, but at least it will make wonderful new seat for the Crypt Keeper! If you take on this project, be sure to email me a photo of the finished product and I will include it in a section of reader’s versions!