

I’m cheap. Not to the exclusion of sanity, but I love the idea of making money go as far as possible. In my haunt I felt I could use a bunch of extra skeletons, but the idea of forking out a hundred dollars apiece for a half dozen buckys left me a little weak in the knees. In retaliation I bought some Big Lots specials, the notorious blown plastic skellies for cheap and a few bags ‘O bones and set out to make them sickening. Here’s how I did it.
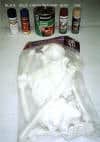
In the how-to’s on my website, I show a method I learned from Jerry Chavez of SpookyFX.Com to glue paper towels to these skeletons to make a rotted corpse, but they are very time consuming and are relatively fragile. My idea for something much faster and hopefully really durable was to use a little different method. I started with the spray paints shown and a gallon of water based Weldwood Contact Adhesive, a half dozen foam brushes and some saw dust
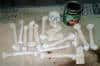
The first step is to apply a layer of the adhesive cement to one section of your corpse at a time using the 2″ or 3″ foam brush. (I suggest not using a nice house painting brush for this, as the brushes get all gooed up every skeleton or so and you would hate to toss a $15 brush every few minutes)

Once you have coated the front side of say the arm and hand, coat all the adhesive with a layer of sawdust. (Note! You should wear surgical gloves for this process, as you will need to rub the sawdust into the joints and across the surface well so it really adheres to the plastic. This makes your hands messy and you will go through about 3 sets of gloves per skelly.) Once you have layered this on well, go on to the next section. Once you have him coated on the front, flip him over and do the same to the backside.
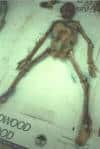
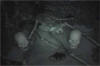
After you have all your bones and skellies dusted well, shake off the excess and lay them out face down. You will be applying a sketchy coat of tan paint to the entire surface (Not a full coat. Miss some spots purposely.) Then move on to the blue paint. This is the color of the veins, so be sure to apply in solid lines and very sparingly to various places as shown in the top pic on the left. There is no right placement, as the body could show this bluing under the skin at various locations. Next, apply the rust color. With this, you can be pretty generous. This is a large part of the rotting color.
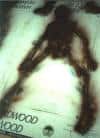
Finally, you will spray the black to the desired rotted effect. You can be very generous with color in this stage, as much of it will be brushed off after these are fully dry. If you get all done and find your corpse isn’t nasty enough you can always go back and touch him up. The black color really does make him take on a nasty burned effect, so be careful. Too much and he will look like he’s been through some really serious trauma. Once the backs are done and you have had practice with the balance of colors, turn them over and do the front sides the same way.

After you have all your bones and skellies painted leave them to dry for at least one day. The glue will take some time to dry out of the excessively heavy areas that really soaked up the sawdust.

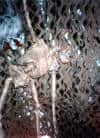
Once fully dry you now need to take a stiff brush to them to remove all the excess paint and sawdust that will not hang on under rough use. As you can see from the pics, they really get a lot lighter once you brush them down. In which case you may want to go back for further touch up at this point.
If you do, try to keep your spray tip back away further than the first applications, as this paint will not really blend with the other colors as well as the first 4 did due to the excess dust has already been removed.

Because these are so durable, I can stick these in garbage bags in the off-season, toss them into my attic, and not worry they will be damaged by the contortions, as the glue adheres the color and texture to the plastic very well and it resists flaking off.
In the light of the haunt, these bones were exceptionally convincing as rotted corpses and the total cost of making 6 is the same as buying a single bucky. I rest my case.