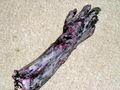
This was the absolutely best arm ever. My goal over the years has been to learn how to make bodies and parts. From 1998 to 2002 I worked with the traditional latex and fluff corpsing techniques. These are awesome, but limited to dried out bodies and heads and stuff. I wanted something fresher.
In 2003 I worked up the Squish technique for corpsing, give a wet, nasty, dissolved, or burnt corpse. That was also awesome, but I wanted fresh bodies. Recently killed. Experiments in 2002 and 2003 with the same squish PVC were promising, but the material had serious limitations.
So this year I used silicon to make a fresh arm, a very fresh DissectedLeg, and of course the PeeledFaces and BodyParts.
This is the story of the arm. Not only did this arm have to look fresh, it had to feel like a real arm. Guests were going to be picking it up and I wanted it to flex correctly, to have them feel the bones under the flesh. I needed to cast a skeleton inside the arm.
This is harder than it sounds.
Supplies
* Body Double 400mL cartridges and gun * 3″ plaster bandages (many) * Vaseline or other plaster-friendly mold release * Evergreen 40 * Ultracal 30 * Sculpey or other polymer clay * Orange Oil (d-Limonene; cleanup and thinning) * Dragon Skin * Thi-Vex II * Silc Pig pigments, mix and use as needed * Paint brushes * Airbrush * (optional: Toluene to thin the silicon)
Arm Life Cast
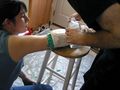
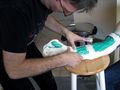
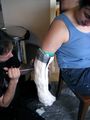
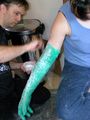
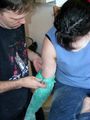
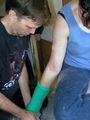
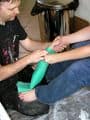
The first step is to get a lifecast of your victim, er, model. This involves painting a lot of Body Double skin-safe silicon onto your model’s arm. I think we went through two cartridges with this.
If you model has hairy arms you are in trouble. You can try using the Body Double release cream, but no matter what you do it’s going to be hard to get a good clean mold from a hairy arm. I recommend shaving.
The first layer is the detail layer. You want to work fast and get a thin layer of Body Double onto your model’s skin. Dab this one with a brush or your hands, being careful to RUB IT IN to the skin to clear bubbles away and to blend any edges.
After this layer, thicken it up with more Body Double. Be sure to give the open end and good thick edge. This stuff goes through a lot of abuse when you take it off the model and you don’t want any weak spots to tear.

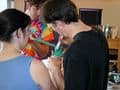
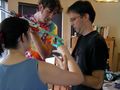
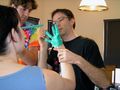


I’m the guy in black, the model is my wife Marla, and the tall guy helping is Matt
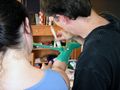
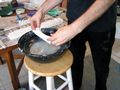
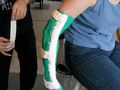
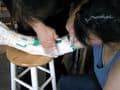
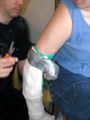
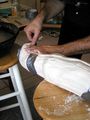
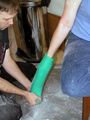
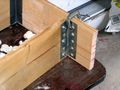
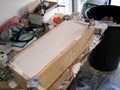
Once you have the silicon in place you need to make a solid backing shell, called the mother mold. To do this, you use plaster bandages, the kind used to set broken arms.
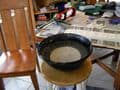
Prepare by cutting a bunch of plaster bandage into roughly 12″ lengths (12 to 18 inches is fine). You will also need a wide, shallow bowl full of water.
You use the bandage by dipping it in the bowl, running it through your fingers to squeege the water out of it, and then applying it to the mold. I rarely use a bandage flat, but I will fold them lengthwise and shortwise (as needed) to make a double-thick bandage.
I first lay a frame of narrow bandage around *half* of the arm, about four layers thick, defining the first half of the mother mold. I then fill this in with wide pieces. Remember, when in doubt make it thicker.
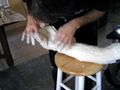
As you lay the bandage down, smooth it out and blend the bandages together.

The plaster first gets hot and then it gets cold again. Once it is cold, it is hard.
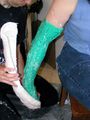
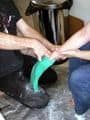
You now go around the edges of the plaster and paint a substantial layer of mold release around it, making a 1/2″ or wider strip along the edge. The second half of the mother mold will overlap the first half, locking onto it.
I used mineral oil because I couldn’t find my vaseline. Do not use mineral oil, it makes a terrible release. Use vaseline.


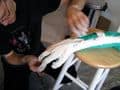
I found that it helped to duct-tape the top of the first half of the shell to the model’s arm (actually, the silicon mold). This kept it from flopping around as I worked. The finger section was pretty well locked into place by itself.
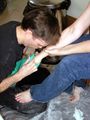
Now you create the second half of the shell, the same as the first half.


Once this half has hardened you need to separate the edges of the two molds. If you use a crummy mold release like I did, this can be quite an effort. Be careful not to damage your model!
Once the edges are released, the mold halves come apart easily.
You can tape the shell back together for safe keeping, until you are ready for it again.

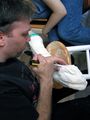


Now you can roll the silicon mold off of the model’s arm. Note that the wrist section will have to stretch significantly to roll off of the hand. I didn’t quite manage to pull Marla’s hand off in the process, but she was fairly adamant that we wouldn’t have a second go at this mold.
Note that I dusted the outside with talc before I started. This was to reduce friction, making it easier to turn the mold back rightside in.


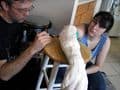
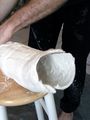
Temporary Positive
The first positive is easy to make. I used Evergreen 40. I was able to make two arms before the mold started to tear. I could have probably made more if I was more careful… or something.
Take the silicon mold and nest it into one half of the mother mold. Carefully set the second half into place. Be careful not to pinch the fingers!
Once everything is in place, duct tape it together and set it into a box. Be careful how you orient the arm! If, for example, the fingers are pointing up, they will trap air bubbles and make a mess of your arm. Not that I would ever do anything like that…
You definitely do not want air bubbles.
With the mold set up, mix and slowly pour the rubber into it. Wait for it to set and remove the new arm from its mold.
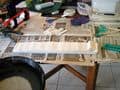
Plaster Block Mold
Now to make a solid plaster block mold for the arm. I originally made a two-part shell mold (like the brain in BodyParts), but I was unhappy with it for the same reasons I was unhappy with the brain. You could do a one-piece mold for some arms, but since I was casting bones into this I needed a two piece mold.
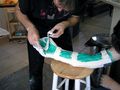
The frame for the block was made from pine boards that had angles srewed onto them. C-clamps are then used to hold the boards together, and duct tape seals the corners.
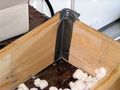
The arm is laid into the box and clay is packed around it. The top of the clay should be at about the centerline of the arm, hand, and fingers. This clay is then smoothed (clever use of sculpting tools can help here) and key marks (bumps or dents) are created in the wide spots.
Mix up a (large) batch of plaster and pour it into the mold. Let it harden.
Remove the boards, flip the block over, and remove the clay.
Paint the plaster with a serious, industrial strength mold release. It is NO FUN when the plaster blocks stick. Trust me on this. The spray releases are not sufficient, and even the PVA release isn’t always a sure option.
I created my own mold release, out of desperation, to ensure an easy separation. I’ve used this in several applications now, and it works for all of them. It will ruin details, though, so you never get to use it directly on models.
Take a small quantity of Sculpey or other polymer clay (I’ve only ever tried this with Sculpey). Now dissolve it in orange oil. Let this sit for a day and stir it well; it should be a thin paste. Paint this onto the clay and let it dry. The residual clay makes an amazingly good mold release.
Now re-assemble the boards around the block, tape the corners, and seal the edges with clay. Cut out rectangles of clay and place them around the edges — these will make pry points later, when you are trying to get the mold halves apart.
If the fingers want to pop up (mine always did), you can glue them in place with a tiny spot of silicon caulk.


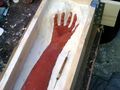
Color and Bones
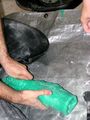
Now we finally get to the final product. The first step is to make a thin skin of silicon on both halves of the mold. This should be translucent, very lightly colored (similar to making the skin in the PeeledFaces). Add Thi-Vex to the silicon so it will stay in place and then paint it with a nice brush into the mold. Before it hardens, wipe away any silicon that is on the face of the mold, because it will make it hard to close the mold. Then clean your brushes in orange oil.
Now you can paint in detailed colors, on the inside of the skin. This makes an excellent effect, since the colors are muted by the intervening skin, giving a great sense of depth. To get good lines and tones, you need to use an airbrush.
I tried a bunch of different ways of airbrushing silicon. On one test arm, I mixed up a small batch of heavily colored silicon and then thinned it to within an inch of its life with orange oil. I then airbrushed this to the outside of a silicon arm. After a few days the last of the orange oil evaporated and the color was pretty stable.
Many other people do this same procedure but thinning the silicon with Toluene. Toluene is nasty. It’s about as flammable as gasoline and if you airbrush it, you are making a finely mixed fuel/air mixture. Any spark, any flame, anything at all (pilot lights, the arcs from the motor of the fan, ANYTHING) and you may end up as spare parts yourself. Be warned.
Of course, orange oil isn’t much better. I did ALL of this work with a high quality, solvent fume rated respirator. Safety first!
No matter what you do, you should filter your pigment so it doesn’t clog your airbrush. I spent a bunch of time with clogs. I don’t recommend it.
What I _finally_ did was thin raw silicon pigment with orange oil and spray that on the inside of the skin of the arm. This never set, but it was never meant to. It’s on the inside!
Oh, and be careful not to spill any of it from the airbrush’s cup.

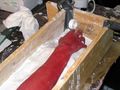
Note that your fingers bend one way much easier than the other. To mimic this, you need to glue tendons to the inside of the finger bones to limit their motion. I used dental floss and J-B Weld, but you are free to use whatever you like. My reverse-bending was not as limited as I would like — a wider strip of material (maybe a nice nylon) might work better.

Now you are ready to set the bones.
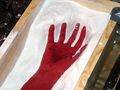
Mix up a batch of silicon with your final coloration. Note that I pre-mix a BUNCH of colors and store them in little containers. I can then use these colors across several batches of silicon, matching them perfectly. Add a bunch of Thi-Vex to the silicon, making a nice paste.
Paint a strip of silicon paste along the backs of the fingers. Paint some paste into the joints between the finger bone. Lay each finger into its bed of silicon.
Paint a good chunk of paste where the wrist goes. Fill the gaps in the wrist bones with paste. Set the wrist into the mold.
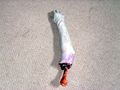
The next step is optional. I’ve tried it both ways and this way makes a better mold, but it’s also harder.
Once the paste silicon has set, mix up a BUNCH more silicon (in the same color, and enough to fill the arm) but keep it thin. Pour some of this around the fingers and wrist. Using a thin tool, make SURE the silicon flows into all the nooks and crannies of the fingers. You really don’t want bubbles here. Go on to the next step QUICKLY.
Final Casting
Take the two haves of the mold and set them together. Stand the mold on end (hole to the top, duh) and strap them together TIGHTLY. You want to minimize your flashing. Don’t use duct tape, it’s not good enough. I use a nylon tie-down strap, like you use to keep things in place in your pickup truck. A block of wood near under the ratchet keeps it from damaging the plaster.
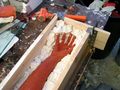
With the mold solidly strapped together, slowly pour silicon into it. Fill it up! Let it set.
Once it is set, remove the strap and carefully separate the mold haves. Pull the arm out. Very carefully, with a sharp pair of thread scissors for example, trim all of the flashing off. Decorate the remaining bits as desired.


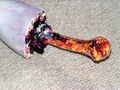
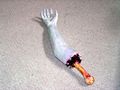
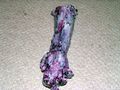
“Failed” Test
My first silicon arm was done in a two-part rubber mold. After making the skin layer, I let this sit for a week or so before finishing the casting. Pulling it out, I found that the rubber and MESSED UP my silicon! It was all gunky. So the skin was actually peeling off the arm.
Cool.
I made up a bunch of colored silicon caulk and enhanced this effect. The result is this nasty arm.