
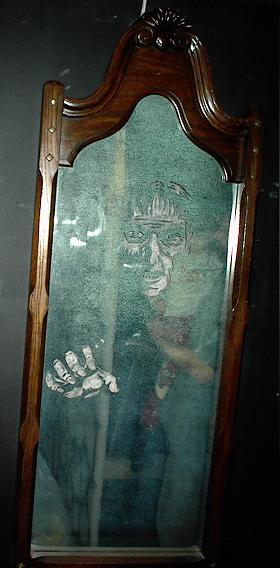
This mirror is a static prop that will make you look twice. When a living person passes by it they will notice the faint glow of a ghostly figure along with their own reflection. The ghostly figure isn’t a reflection at all. The ghost is etched into the mirror from the reverse side and backlit with a dim blue bulb. This project took some time and patience, but the end result was well worth it. This was meant to be more of an ambiance kind of prop, but it worked so well that it became a centerpiece prop.
Because I got the mirror for free this project cost me next to nothing to create. Here is what you will need to do a similar project:
- 1 framed mirror
- A ghostly stencil. You can download the image I created at the bottom of this page or you can create your own.
- Tracing paper
- Carbon paper
- Rotary tool with sanding or grinding bits
- Screwdriver and hammer
- Utility blade
- Lamp or light socket with a dull glowing bulb
- Jigsaw
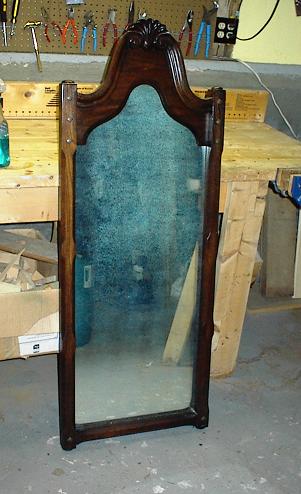
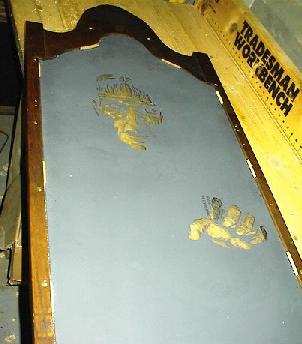
To begin with, find an appropriate mirror. My town has a bulk junk pickup once a year, so once in a while I find something that is worth grabbing. My wife spotted this gem of a mirror in a junk heap in front of someone’s house and called me to let me know about it. It was still there when I got back from work, so I picked it up. Opportunity overrides pride. I found that this mirror was dated 1968 and had a great antique look. As you can see the reflective coating is pock marked with corrosion, but I thought it would only add to the effect. The mirror you choose does not need to look anything like this, but be sure the image you will be etching will fit on the mirror you do select.
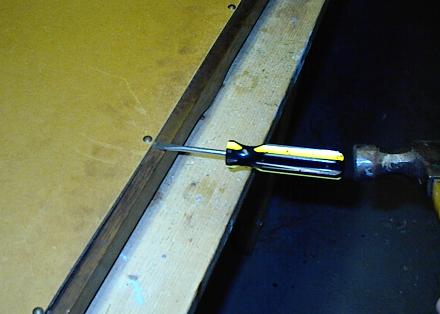
Use caution when working with glass. The glass could shatter at anytime, so be sure to use goggles. Also, it might be prudent to use a dust mask when it comes time to do the etching. A long sleeve shirt couldn’t hurt either. This particular mirror had a cardboard backing. The backing was tacked on. I carefully removed the tacks with a screwdriver and hammer and put the tacks in a container for later use.
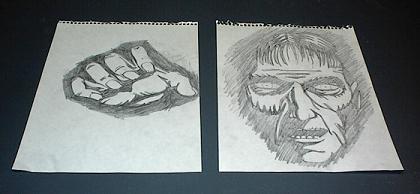
The drawing I made was a combination of some art I found on the web and a comic book picture. I combined the elements that I liked to come up with a ghostly look. I wanted a look that would only show the features of the face that would show in a harsh light. Also, I didn’t want to create too much detail. I wasn’t sure how sharp I could etch the image and I didn’t want the project to take too long. I couldn’t find the type of artwork I wanted for the hand so I took a picture of my own hand with a digital camera and played with the saturation and brightness until I got the look I wanted and drew from there. By downloading the stencil at the bottom of this page, you won’t have to go through all that nonsense.

I used tracing paper to outline the images. This became my working stencil. I kept it as simple as I could without losing too much of the realism.

I placed the stencils face down on the back of the mirror, positioning them where I wanted them in relation to front of the frame. I taped them down, then slipped carbon paper underneath them. I then traced the images, transferring them to the back of the mirror. Once I removed the stencils and carbon paper I found that there was a good contrast between the carbon markings and the gray paint on the back of the mirror.

I used a rotary tool to do a good portion of the etching. By “etching” here, I don’t mean that I actually cut into the glass like you would with an etching tool. I merely removed the paint and reflective silver surface. I experimented with cutting, grinding and sanding bits. Some of the conical grinding bits were useful for the thick lines and the grinding wheel was good for clearing away open areas. But the best tool was the utility blade. I took the blade out of my utility knife and used it like that. If you do this, be extra cautious. The blade makes nice, sharp, thin lines in fingers as well as paint. I found that the best method for me was to trace the lines with the utility blade and scratch away the paint near the lines, then follow behind with the rotary tool. Take care to clear away only the paint that will form the image. It is very easy to make a mistake and remove paint from the wrong side of a line. Take your time.
Now we have finished the etching. If you are going to paint the image instead of back lighting it, now is the time to do so. It might be a good idea to use fluorescent paint and then display the mirror under a black light, but I didn’t try that. I did try backing up the image with white paper, yellow fluorescent paper and a chrome coated material (Silver Mylar) but I couldn’t quite get the effect I was looking for. That’s when I decided to back light it instead. Since this mirror is going to now be back lit we will have to cut holes in the cardboard backing so that light is able to show through the image. I did this by placing the backing into position and lifting one side slightly so that I could estimate where the image was in relation to the backing. I used a pencil to draw rough circles on the backing around the images of the face and hand, making sure that the circles were wider than the images. The light bleeds through the area around the image as well as the image itself, so you don’t want to make the cut so close the image that you be able to make out the shape cut in the backing when all is said and done. I then used a jig saw to cut the circles from the backing. When that was done I tacked it back into place using the same tacks I removed earlier.
When it came to backlighting the mirror, I removed a section of drywall behind the area where I hung the mirror (my haunt is in my garage). I also made sure any insulation was removed from the area. I had a friend wire a light socket in the wall behind the mirror since I’m not good with that type of thing. The socket was positioned so that the bulb would not fall directly behind the image of the face or hand. We didn’t want people to see the bulb through the mirror and destroy the illusion. If you don’t have the luxury of friends who do this sort of thing for a living you may want to use a small lamp, a night light, or even Christmas lights, just make sure they can’t be seen through the etched image. I experimented with a black light bulb, but it gave off too much heat and I felt it was a fire hazard. I tried different colored bulbs and found a low-watt dull blue bulb that worked nicely. It didn’t get all that hot and did not touch the mirror or the back of the wall (which was plywood) so there was no danger of it causing a fire. If you do something like this please take similar precautions. No prop is worth endangering someone’s life even if there is only the smallest chance of that happening.
I also painted the inside of the wall section with white paint to increase the glow. When all was done we hung the mirror. One more note: You don’t want to have the area where the mirror is in well lit, but you do need a different light source so that people will be able to see their own reflection in the mirror as well.