
This prop is nothing more than an illusion done with mirrors. I’m not sure what the official name of this prop would be, so I’m calling mine the Half Monster Box. To build this prop, you will need a some knowledge of carpentry. I didn’t have a working plan, so I had to make things up as I went along. I would have been better off drawing up a plan and buying stock, but the bottom line is: I’m cheap. I did much of this with scrap material. I’d be surprised if I ended up spending thirty bucks on the whole project. My biggest expense was the paint. Because of this, I don’t have an accurate list of materials or cost. Here’s a quick list of things you will need:
- 2 Large Mirrors – I picked mine up at yard sales (OK, the trash)
- Plywood – I used different thicknesses, whatever I had on hand
- 2x3s – off the top of my head I would say at least 4 (I used scrap)
- Joint Compound – Only if you need to smooth the wood for a metal look
- Paint – Some primer and Rustoleum Hammered Gray or Silver (I used both)
- Drywall Screws – various sizes
- L-Brackets – 2 of these, big enough to secure with 4 screws each
- Optional parts are things like PVC pipe, light rope, hose and light fixtures.
There are a number of variations of this illusion, the most common being the “Living Head on the Table”. Another version looks like a head and arms atop a stripped spine and rib cage. My version hides only the legs of the user. One advantage of this prop is that the actor does not have to be crouched down or bent forward. He or she can stand straight up, making for a more comfortable night.
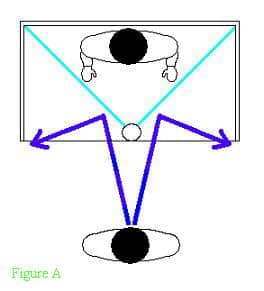
Let’s start with how the illusion works. There are two mirrors placed at 90 degree angles between the actor and the onlooker. The mirrors form a V pattern in front of the actor, hiding the body or legs. What the onlooker sees instead of the actor’s lower body is the reflection of the walls to the left and right of the actor. The trick is to make the reflection look like the back wall of the box. If this is done well, it appears to the onlooker that there is empty space below the actor’s head or torso.
I started this prop by building a small model to test the theory. It’s a good thing I did this, because my first model didn’t work properly. I thought the the mirrors would reflect just the walls as long as they were at 90 degree angles, but they must also be placed in the back half of the box, otherwise the mirrors only reflect the walls if you are standing at a certain angle. Figure A shows the wrong placement, while Figure B shows the correct placement.

I built the box in my basement, then disassembled it so that I could move it to my garage and paint it. What you see in the pictures provided are the parts as they are about to be painted or already painted and reassembled.
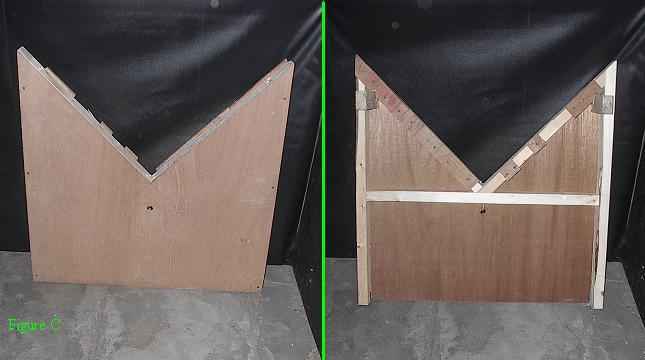
I started with a 1/8″ piece of plywood that would become the bottom of the box. I knew the plywood here would not have to support any weight, so the thickness wasn’t important. What was important was the angles and straight edges. If the cuts were off here I knew the illusion would not work. I cut a 3′ x 3′ piece from the plywood, careful to make the angles perfectly square. I drew lines from corner to corner with a straight edge so that I had an X with 90 degree angles, then cut a V out of one of the sections. Once that was done I framed the under-side with 2x3s. The missing V would allow the actor to stand on the floor.
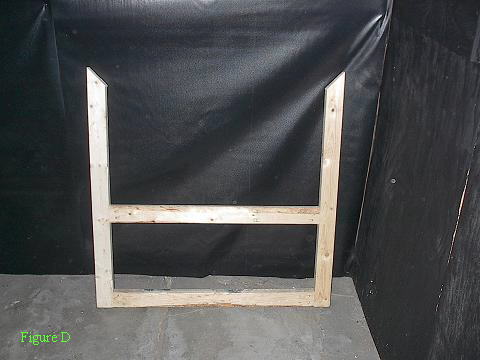
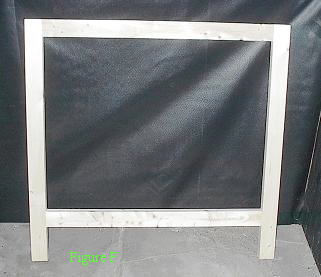
For the top, I started with the frame. It was basically 3’x3′ with one open side. On the open side I cut the ends of the 2x3s at 90 degree angles. Note the location of the middle stud in Figure D. It is out of the way of where the mirrors will be later.
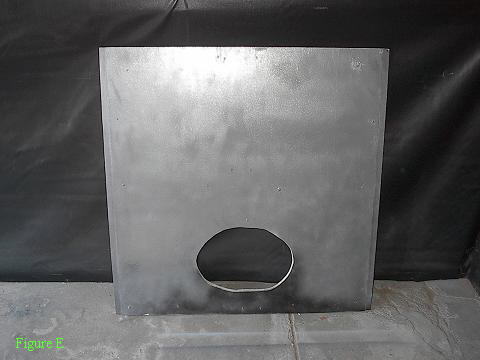
Next, I covered the frame with plywood. I actually used three separate pieces of scrap plywood, 2 pieces of 3/4″ and one piece of 1/8″ layered over the two halves of the thicker plywood, just because I didn’t have large enough scrap pieces. You can use one solid piece of 3/4″. This piece will have to support some weight as the actor moves into position. I cut the plywood a couple of inches wider and longer than the frame to that the top would have an overhang and hide any joints. In Figure E, a hole is already cut for the actor and the plywood is painted, but save these steps for later.
The next piece I made is the front. I milled down a couple of 2×3’s so that the edges would be angular as opposed to slightly rounded like stud corners have. The end result left me with stock much thinner than 2″x3″. I don’t think many of you will have a jointer or planer to do this with, so you may try ripping 2x3s on a table saw or using different stock like plywood or strips of hardwood. It was important to me to have sharply angled corners because I wanted a metal look to the front, but you may want a different finish. The measurements of the wood will depend on how tall you want the prop to be. There are a few factors to consider. One will be the height of your mirrors. Another will be how high you want the top of the box. You’ll notice I have legs on my box. This is because I wanted the top of the box at waist level, but the mirrors weren’t long enough to reach the floor. Also, make this piece wide enough to hide the edges of the plywood that will connect to it.
The side panels are cut next. I used 3/8″ plywood for this. Here’s a picture of one of the panels painted already. The measurements will again depend on the height of your mirrors. I’ll get into that a little later. The width will be slightly larger than 3′.

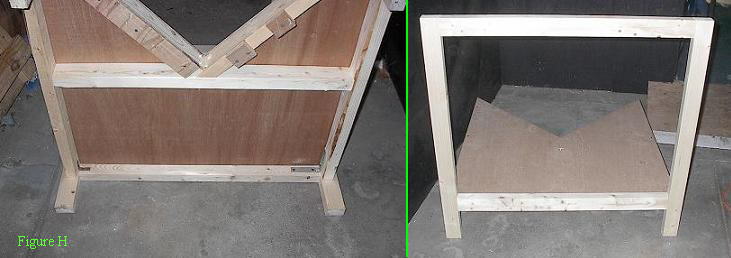
It’s time now to begin assembling. I started with the front face and bottom. I used L-Brackets to connect these pieces. They are different sizes because that is what I had on hand. The first picture shows an extra pair of legs that I attached to the inside of the bottom frame with some scrap stock (you have to look hard at the top of the picture, they are barely in frame). If you scroll down to Figure I, you can get a better look at one of the back legs. The second picture in Figure H shows the parts assembled and facing front.
Next, I put on one side, then the top frame, then the remaining side. Pictured here in Figure I is one side and the top frame. If you are working alone, clamps make great extra hands. Make sure that any screws that you do not want to show are counter-sunk, so that they can be covered. This is starting to look like something instead of a bunch of parts that make you scratch your head.

Before we put on the top plywood or mirrors, it might be a good idea to add some extras while we have the room to work. Pictured in Figure J is a wide PVC pipe that I used to hide the gap between the two mirrors. PVC cuts easily with a jig saw. I also added smaller diameter PVC pipes towards the back to help hide the back corners of the mirrors (see figure M).

Here in Figure K we have the large PVC pipe installed as well as some light fixtures I made. You don’t have to make light fixtures, but if you do, be sure to place them in just the right position. When the mirrors are installed, it will look like there is an additional light fixture on the “back wall”.If they flickered at different times, the illusionary back light wouldn’t look right and people might suspect something. Instead of using lights, additional 2x3s or PVC might be used to break things up. I do suggest you find a way to light the box from the inside so that the onlooker can see that the box is empty.

Figure L is a close-up picture of the light boxes I made. It is just three small pieces of 3/4″ plywood squares on the top, bottom and back side with a couple of thin pieces of plywood screwed to each side. A cut some plastic from a transparent ceiling drop panel. If you are careful enough you can cut the plastic with a straight edge and a utility knife. The clear panels are held in with L-shaped rails for ceiling drop panels. If you use lighting, make sure it is symmetrical or it will ruin the illusion. More importantly, make sure the wiring is done right and that the bulbs don’t get hot enough to start a fire.

Here comes the tough part: Cutting and installing the mirrors. The mirrors I used were different sizes, so I had to use a glass cutter to get the sizes I wanted. I had a hard time with this because of the thickness of the mirrors (much thicker than glass panes) and my inexperience. I practiced cutting scrap mirrors before I moved on to the real thing. One of the mirror sides came out horrible, but the middle PVC pipe hides the jagged edge well.
The mirror doesn’t rest on the bottom piece of plywood or the floor. I screwed little pieces of scrap plywood to the bottom 2x3s that formed the V, allowing them to overhang by the thickness of the mirror creating a ridge for the mirror to rest on. If you look back at Figure C, you will see the little overhangs around the V-section. If you are wondering why I didn’t just cut two strips of plywood instead of a bunch of smaller pieces, it was to accommodate my messy glass cutting. Only the flat parts of the mirror’s edge would rest on the plywood pieces. If you manage to cut straight edges on your mirrors, you won’t have to go through any of that. Anyway, I rested the mirror on the overhangs, then placed plywood panels behind the mirrors, screwing the panels into the overhangs at the bottom (careful not to hit glass) and securing it at the top with blocks of wood that were screwed to the underside of the top. It is important to put these plywood panels in place to protect the mirrors and the actor. I don’t have a picture of the plywood panels. I used multiple scrap pieces and it is ugly, but nobody could see the mess I made.
Figure M shows the box with one mirror in place. Note the PVC pipes that tactfully hide the seams where the mirrors connect to the corners of the box. In this picture, one of those pipes is reflected in the mirror, breaking up the plainness of the back wall.

Once the second mirror is in place, measure and cut a hole in the top panel where your actor will stand. I formed an elongated circle with a tape measure at about 32″ diameter. Of course, the measurements for the hole will depend on the actor. If you scroll back up to Figure E, you can see the hole I cut. Also, you should make the measurements with the mirrors in place, but remove the mirrors when you make the cut. I used a jigsaw for this and there was a good chance of breaking the mirrors with the vibration alone.
With the box finally together, it is time to take it apart and paint it. You may get away with just removing the mirrors, but I wanted to do a thorough job. I used joint compound to fill in cracks, screw holes and wood grain, sanding it all smooth. Make sure you prime everything you will paint, otherwise you will go through a lot of cans of expensive spray paint. I used some gray latex paint as a primer. I used Rustoleum Hammered paints for the finish. This stuff will make anything look like metal. One thing you want to make sure you do is paint the back of the V section where the mirror rests. If you don’t, you might see a plywood line where the mirror meets the wood on the bottom. When everything is painted, re-assemble it.
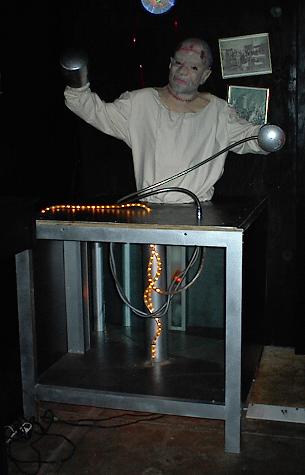
To add some flare I used shower hoses, rope light and additional PVC tubes, whatever I had on hand. I also tacked some orange Christmas/Halloween lights under the box. If I had the time I might have added rivets, but there were too many other projects to work on. Figure N shows the completed box.
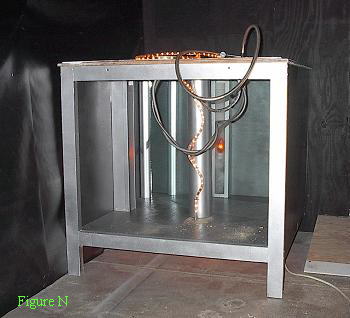
Some painted PVC pipe end caps were used to hide the actor’s hands. I wanted the actor to wear a mask instead of makeup, so that he would look completely fake. On Halloween, not one visitor suspected there was a live person wearing a mask. Not one. This was one of the most effective scares that I’ve ever used.