

It was the best of times, it was the worst of times … it was the season of Light, it was the season of Darkness … we were all going direct to Heaven, we were all going direct the other way . . . ~ Charles Dickens
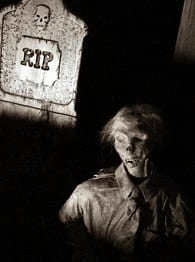
Ghouls take many forms in the depths of our fondest nightmares. Certainly one of the most gruesome figures you’re likely to encounter in any haunted graveyard is a rotting corpse clawing its way out of the ground, its wormy slumber disturbed, and nothing better to do than join the casting call for a George Romero movie.
Spooky Blue is a huge fan of just about every movie that ends in “of The Dead”, with a particular fondness for the original black and white “Night of The Living Dead”. Aside from rampaging alien tripods ala “War of The Worlds”, I can’t think of anything more terrifying and fascinating than hordes of the undead pouring out of the ground to walk among and feed upon the living.
Sounds like another great project to build out of newspaper and carpet glue.
Inspiration – Rot

People have throughout history found inspiration in great works of art, symphonies, true love, and really good hamburgers. Call it some special influence of a divinity on the mind, but I think of it more as catching a glimpse of some heretofore intangible and saying, “Wow! I never thought of that!”
In the case of our ground breakers, we bow once again to our artfully twisted friend, John at PumpkinRot. I have tremendous respect and admiration for John’s work. He consistently and unpretentiously creates wonderful Things that no one has ever seen before. Having seen what’s possible using mundane materials, I couldn’t help but borrow some of his concepts and run … like a raving lunatic … eating a really good hamburger.
I’ve said this before. The inspiration to create is such a cool gift. Thanks, John! ~ Spooky
Materials List

| We’ll be looking at two different construction methods. Method 1 utilizes poultry screen (chicken wire), duct tape, and newspaper for the torso. Method 2 employs rolled up newspaper and duct tape almost exclusively for the torso. | |
| Newspaper, paper towel, duct tape, chicken wire, wire coat hangers | Believe it or not, cheap black duct tape from Big Lots works really well. If you decide on chicken wire for your torso, it comes in rolls at any home improvement store. |
| Latex carpet adhesive | Walmart, Lowes, or your favorite home improvement store. |
| A foam wig stand or a plastic skull or a cheap foam skull. | If you want to get right to the fun stuff and don’t really feel like sculpting a face out of a foam wig stand, get a plastic or foam skull (or two or three). The cheap foam skulls I found at Walgreens during Halloween, but plastic skulls can be found year-round at Anatomical Chart Company. Big Lots is a good source for foam skulls during the Halloween season. |
| Flat latex paint | Visit your local specialty paint store (Porter Paints, Sherwin Williams), or home improvement center and ask them for mismatched paint. Tans, browns, and greens are good, and you can usually score them for less than $5.00/gallon. Ask nicely and they may even add some tint for you to get the color closer to something really icky. |
| Scrap plywood, 1×2 or 1×4 scraps, a bit of plywood, and wood screws | If you don’t have any scrap wood, then go to the closest lumber yard and ask for “ferring strips”. These are usually 8′ 1×2 – 1×4 boards of really poor quality (cheap!). We used 1′ x 1′ squares of plywood for our base, but you can substitute a few pieces of scrap nailed together to save on cost. |
| Optional | |
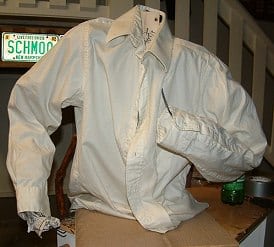
| Hot glue & glue gun (for making teeth and fingernails), clothing | Recycle that button-down shirt with the yellow collar that’s been hanging in the closet since 1989. You can also try an old sport coat and a tie. Who doesn’t have a tie that’d look better on a corpse than on you? Alternatively, Good Will or Salvation Army is always a treasure trove of corpse clothes. |
| Acryllic floor sealer or cheap deck sealer | Any home improvement store. |
Short cuts
| Just want the highlights? Here ya go … | |
| Chicken wire torso | Quick and dirty method of building a sort-of interesting torso |
| Rolled newspaper torso | More in-depth method of building a very disgusting torso |
| Making hands | Need a hand? |
| Fingernails and teeth | Make your own fingernails & teeth using hot glue |
| Shaping a foam wig stand | Turn a foam wig stand into a corpsey head |
| Spooky Glue | A lightweight alternative to monster mud |
| Seal your corpse | Some pointers for applying protectant |
| Corpse sculpting | Adding fine details to your corpse by sculpting with newspaper & glue |
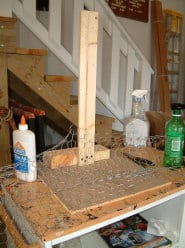
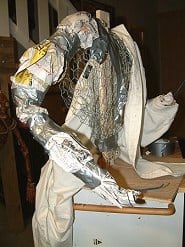
Method 1: Chicken wire torso & foam head method
Walter
If you need a quick-and-dirty torso in a couple of hours, then the chicken wire method is for you. If you’re interested in a more in-depth project, then skip ahead to Method 2.
Attach your armature (upright piece of wood) to your base (a piece of plywood or a couple of scraps nailed together). The base should have a little weight to it so your corpse doesn’t end up being top heavy. That’s just humiliating. Decide how much of the torso you want to show above ground. In our example, we opted for a full-torso (about 20″). You might try angling your upright if you don’t want your corpse to be sitting at attention. I didn’t think of this until too late, but you have the benefit of my mistakes. However, if you want your corpse to look like he was startled out of the grave, then that’s okay, too.
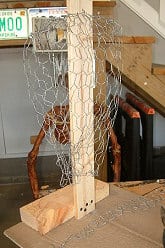
Now is when you put on those leather gloves your wife makes you wear when you’re making Pop Tarts. Cut a length of chicken wire (about 4′ or so) from your roll and form it around the upright. Use wire, staples, duct tape … whatever … to firmly attach the chicken wire form to the upright. Leave 4″-5″ at the top of the upright to attach your foam head. You can really mash the chicken wire, so don’t be afraid to make your corpse look really fat, hump-backed, or spindly. Fill out the shoulders with wads or rolls of newspaper wrapped in duct tape.
Arms ~ Coat hanger wire, newspaper, & duct tape
Unwind a wire coat hanger. Measure the length of your upper arm and forearm, and cut to those lengths. Extend the lower (forearm) two or three inches. This is where we’ll attach the hands.
Using wire, extra coat hanger, or scrap chicken wire, attach the upper arms to the shoulders. Use the same method to attach the forearms at the elbows. Wrap with lots of newspaper and duct tape. Fill out the arms or make them thin. The more you fill, the less your corpse will look like a shirt draped over a wad of chicken wire.
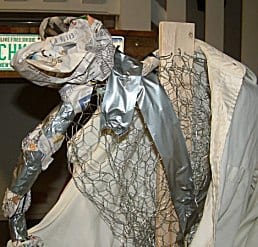
Dress your corpse. If the arms and shoulders aren’t filled out enough, peel back the shirt and use more newspaper. If there is just too much material (Am I this big?), pull it from the back and tack off the excess. If you’re not very handy with a needle and thread, just bunch up the excess and tie it off with string. Then roll or fold it together. Do all this on the back of your torso to hide your awful needlework.
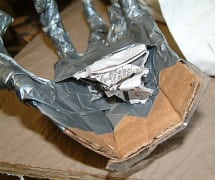
Hands ~ Cardboard, coathanger wire, & duct tape
Using a bit of cardboard (I know I didn’t include this in the materials list. Geez, as much stuff as you buy off eBay, and you don’t have a cardboard box lying around?), cut out a piece that is roughly the size of your hand. Cut so that the corrugation (little ridges) are perpindicular to the direction of your fingers.
Using wire cutters, cut fingers from wire coat hanger (don’t get that mixed up). Make them an inch or two longer than they really should be and insert them into the cardboard “palm”. They should go through several of the corrugation ridges. This will add strength.


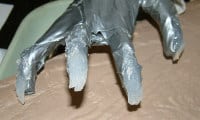
Wrap duct tape around the palm and form “webbing” between the fingers. This will also help to keep them from slipping out of the palm. Next, use newspaper and duct tape, or just plain duct tape to make fingers.
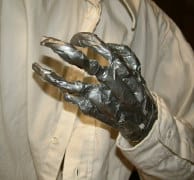
Warp the palm as if it were cupping something (cough cough), stuff a wad of newspaper in the void and cover with duct tape. This will help things look more natural. Otherwise your corpse might look like he’s got a terminal case of “jazz hands”.
Shove the palm onto the bit of coat hanger you left on the end of the arm and use duct tape to attach it to the arm.

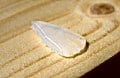
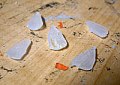
Fingernails ~ Hot glue
Fellow haunter and corpse specialist Gary Adams let me in on this neat trick. You can make fingernails and teeth using hot glue.
Using a Dremel or other wood working tools, gouge out some fingernail-shaped holes in a scrap of wood. Smear some petroleum jelly in the holes and fill with hot glue. When the glue has cooled (and not before unless you’re still wearing your Pop Tart making gloves), peel them out. Neat! Use a dab of hot glue to attach to your fingers (your corpse’s fingers, nimrod).


The head ~ It was pretty once
Ah, the foam wig head. What flying crank ghost is complete without one? They’re almost pretty, aren’t they? Well, we’ll fix that right up.
Cut away those pretty cheek bones, that perky nose, and other excess foam using a Dremel, sand paper, or wood burner I ruined a soldering iron on this, so keep that in mind before you destroy your favorite soldering iron. You can attempt to cut out a mouth, but I just whacked the whole jaw off, shaped it (poorly) to look more skeletal, and re-attached it with hot glue.
Drag the side of your iron along the face to shape and smooth the foam. The soldering iron worked well for melting eye sockets, too. Just remember that this iron is toast if you plan on trying to use it for soldering anything in the future. Of course, a new tip isn’t that expensive.
Teeth
Make a few extra fingernails using your hot glue fingernail molds. Now, clip them with wirecutters to form teeth. Basically just nip along the sides to form a point on one end. You can also drill out little fiddly-bits to resemble tooth decay. In the upper and lower jaw, melt tooth holes with your iron. Squeeze out a small gob of hot glue in the hole, and insert the tooth.
Attach the foam head
Gouge 3-4 inches out of the center of the neck and dry-fit by sliding it down over the top of the upright. Trim off the excess foam around the base of the neck so it doesn’t look like your corpse swallowed a frozen hotdog. Make any necessary adjustments to the neck cavity. Then pull it back off, squeeze a good amount of hot glue into the neck cavity, and place it back on the upright. You’ll probably need to hold it in place for a few minutes until the glue sets up.
Finishing touches ~ “Spooky Glue”
Corpse the head and hands using standard corpsing methods, and paint your corpse to look gross. I like to water down my paint and dry-brush or sponge it on. Start with a dark color, then go back with something lighter.
Here’s a good one to try. Spooky Glue! Pour about 2 cups of Elmer’s glue into a bucket, then mix in a handful of dirt and about 1/2 cup of latex paint. Coat the entire body, clothes included. Work it into the material with your hands. When the glue sets up, the clothes get nice and stiff.
This is a lot lighter than monster mud, and the result is a stiff shell. The tradeoff is that this won’t be nearly as weatherproof as a monster mud creature. That’s what sealer is for.
Oh … Walter’s hair came from an old wig. Cut lengths of 10-20 strands at a time and hot glue them to his scalp. I liked the wispy look, but you could go for more of a bouffant style if you like.


Seal your corpse!
I used acryllic floor sealer, but I suspect anything that will soak into porous material and repel water will work just as well. Use a paintbrush, or pour into a spray bottle and mist it on. This makes application much easier. However, sealer wasn’t intended to be sprayed in such a manner, so take precautions. Any time you introduce chemicals in small droplets with air, there is a real chance of combustion (depending on the chemical), not to mention the added risk of inhalation. Do not breathe the mist. Work outdoors. Keep all flames away from your application area. Wear protective clothing, and keep the pets and kiddies away. We didn’t have any problems, but we followed the above precautions. This is a great timesaver, but if you’re the type who would check a water heater’s pilot light with a match, then put down the chemicals and step away.
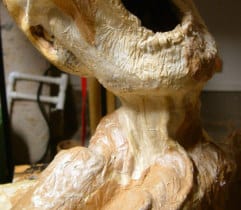
Method 2: Rolled newspaper torso & pre-formed skull method
Harold
Walter (method 1) is a fine corpse, but we wanted to turn up the creep factor about fifty notches and build something that no one (around here, anyway) had ever seen before. A really nasty, skeletal corpse needs a skeleton, so we built one out of rolled up newspaper.
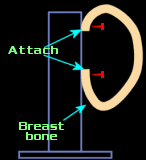
Harold the corpse is just a torso, so he needed four ribs, a collar bone, and arms. He also needed a breast bone to hold his ribs in place. We tightly rolled 3 full sheets of newspaper (in layers) for each bone and wrapped them in duct tape. Sections that were a little too long were easily cut to the proper size.
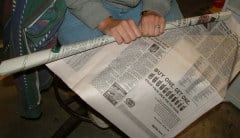
We found that it was easier to make lots of bones first, then build our skeleton from the pieces. An empty cardboard tube from an industrial fabric roll made an excellent upright, but you can use scrap wood, or even pvc. Just make sure that your upright is strong enough to support everything, and attach it to a plywood base. If plywood isn’t an option, a few pieces of scrap wood or a short length of 2×4 will work just fine.
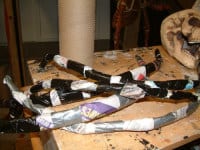
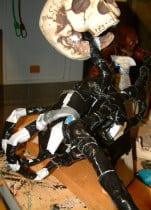
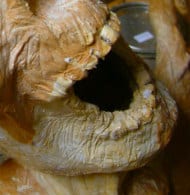
Breastbone & ribcage
Harold’s breastbone is much longer than it really needs to be, but that’s okay. This was our first corpse of this style, so we’ll work refinements like a shorter breastbone into later versions (Bob, Xavier, Horace).
Bend one of your newspaper “bones” to form a “C” and attach the ends to the upright with drywall screws. This works well as long as you don’t tighten them down too far. Go too far and the paper will pull right through.
One full-length rolled-up duct-taped newspaper bone is just the right size for two ribs. Cut it in half and duct tape the ribs to either side of the breast bone. Bend them around and duct tape to the upright. Repeat this for each rib, angling them downward as you get closer to the base.
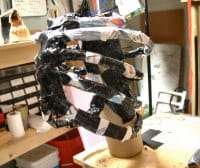
Experiment with different lengths for each rib, and don’t be afraid to use lots of duct tape. The cheap stuff from Big Lots works very well. Introduce deformities if you want. Build one side of the torso higher than the other, or better yet, mount the upright at an angle so your corpse is hunched over, leaning forward, leaning back, whatever.
This is the point at which your corpse will take on a distinct character. What is he doing besides just sitting there? Has he just broken free of the ground and is taking his first rancid breath in years? Is he crawling toward an unsuspecting prey item? (TOTs make great unsuspecting prey items) Maybe he’s really agitated, angry, screaming, scratching, ordering a drink … something. The idea is to capture a moment and freeze it.
If you notice that some of your bones bend too easily or crimp, then wrap them with a little extra duct tape, or wrap an extra layer of newspaper around them. It should look sort of like an Alien in larval form attacking your upright.
“How do we kill it Ash? There’s got to be a way of killing it, how – HOW do we do it?” ~~

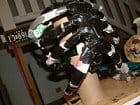

The neck bone’s connected to the head bone. Attach another newspaper roll to the upright for the “neck bone”. This will take some adjusting to get it just the right length. Of course, a long-neck corpse looks pretty icky, too, so if that’s what you’re going for then have at it.
More newspaper bones attached to the top of the upright (to form the clavicle) make an excellent place to attach the arms. We opted not to make hands for this corpse since they’d just be lost in our graveyard grass that hadn’t been mowed since October 1.
Add extra wads of newspaper at the joints to make them look nice and boney. We went the extra mile and rolled two bones (radius and ulna) for Harold’s forearms. A good graphic of the human skeleton is very helpful. If you have a spare bucky lying around with aspirations of a modeling career, that works even better.
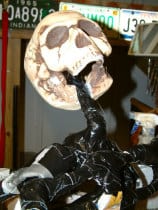

Harold’s head – A foam skull
And my head, I’d be scratchin’, while my thoughts were busy hatchin’, if I only had a brain … and a head.
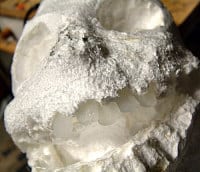
This particular foam skull came from Walgreens, but I have seen them at Big Lots for around $5. The jaw is closed. However, with a few razor blade cuts it comes right off. Then just reset it with a little hot glue for a gaping grimace … or hamburglar, if you’re frightened by purple blobs.


It might be a good idea to attach your headbone to the neckbone before gluing the jaw back on (sigh…but we learned). Just cut a neckbone-sized slot in the bottom of the skull and hot glue it to the neck. A plasic skull would probably work just fine, but you may need to route out the “neck hole” for a snug fit. And you want your head to fit tightly. Otherwise you may end up with a corpse that is preoccupied with the sky … or the ground … or that just basically looks like the robot from Lost in Space after he got his power pack pulled out.
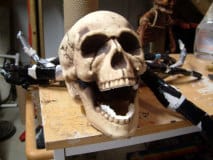
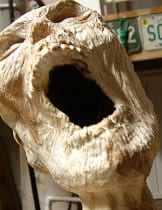
My, what straight teeth you have.

This foam skull had the straightest teeth we’ve ever seen. Not scary. So we made some teeth using Gary Adam’s neat hot glue trick (scroll down to the foam head section). We cut away thousands of dollars of orthodontia, then used a woodburner (soldering iron) to burn sockets for his new teeth. Put a dab of hot glue in each socket, then push in the new tooth.
If you’re into vampires, then you can make some really long, pointy canines that would give Anne Rice a warm-all-over feeling. We were fairly conservative with our teeth, but you can make yours really gross. If you need some ideas, just think back to those really scary posters your dentist has hanging in his office to terrify you into seeing him twice a year. “Do you floss? No? Well, then check out poor Eugene over here.” <shiver>
Slap me some skin, bro
If you want your corpse to be more interesting to look at than say, a dead mole or a melting stick of butter, then a good skin job is a must.
Stuff newspaper into all the cavities of your corpse. This makes the paper mache work much easier. Apply carpet latex to news paper strips and place them over the rib cage. Start with the rib cage, then do the arms and the neck. Build up the neck with rolled newspaper and/or duct tape.
Add as many layers as you like, and make sure there are no holes around the base for outdoor critters to make a homey little nest.

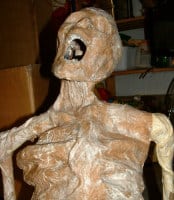
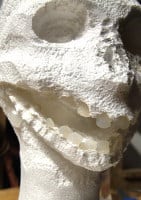
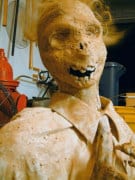
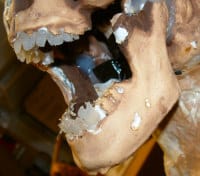
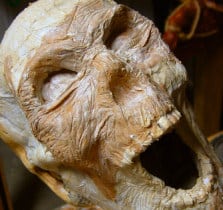
Turning the skull into a head
A skull is spooky, but a rotting head is pretty damn terrifying.
Start by laying strips of newspaper along either side of your mouth. After you’ve grown tired of that, put them on your corpse’s head to form the skin for his cheeks. The idea is to turn that smiling skull into a screaming head. Use plenty of glue, and apply 3-4 layers of newspaper. Tear your newspaper strips so the ends are ragged to help them blend into the rest of the face, and alternate with longer strips that cover the sides of his head and jaw. You can increase the strength of your corpse cheeks by adding a strip of duct tape to the inside of the mouth.
You can opt not to cover the bottom of the jaw, but if you do cover this area, make sure not to build up the chin too far or he’ll suffer from the “pelican effect”. Not scary.


Pay extra attention to the neck. You have lots of muscles and sinewy stuff on your neck to hold up your head (ick), so your corpse wants some too. Run newspaper strips all the way from the shoulders to the sides of the head. This will give the impression of a continuous mass of flesh instead of a stalk. Be sure not to leave pockets of air under your skin, especially on the neck, or you could end up with a case of the saggies that could tear. Each layer should stick to the layer below it.
Corpse your corpse
Your corpse is basically done at this point except for the final layer of skin. Use paper towel or your favorite corpsing material and detail the heck out of him. I have a standard corpsing procedure for this sort of thing. Carpet latex and paper towel makes an excellent boiled-chicken kind of skin.
You can really have a lot of fun adding all sorts of gross details like bulging veins running down his neck, extra sagging skin on his face, and even eyeballs . Overdo it. Exaggeration is key. Especially if your corpse will be placed very far away from your spectators (prey items). I like to put a few layers of skin over the face to make it look like the skin is pulled tight to the skull. You can even build up a face if you like. Add layers around the eye sockets and over the nasal cavity. Maybe even make it look like half the face has been ripped off. Bleah.
Want to add an extra, totally unnecessary, over the top level of chilling detail? How about something neat like corpse-sculpting?
Heh … read on.
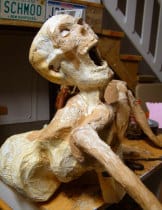
Sam the corpse
Mrs. Spooky Blue challenged me to build corpse number 3 (Sam) to look as if he were crawling out of his grave. With only a week before opening night, and with tombstones yet to build (do NOT sell all your tombstones at a yardsale, no matter how much money they bring … money isn’t everything), I said, “no way,” and was hell-bent on sticking with the same design we used for Harold (corpse number 2). It was a tested design. It worked. Why invite disaster?
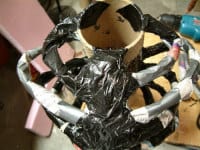
Sigh. Here is Sam. The torso follows a radically different design than Harold’s. Instead of an upright armature, I made a sort-of doorstop out of 2×4 scraps. To this I attached the ribs and other rolled-up-newspaper-bones. You know what? It looked awesome. If you’re a guy and you don’t have a wife, I recommend you go out and find one. (Love you, sweetie)

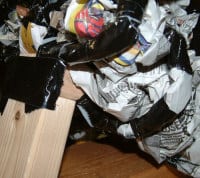
Sam leans forward instead of sitting upright. I added extra support to his neck and arms. The arms actually help to keep him from tipping over. I eschewed hands again since they wouldn’t really be visible in the tall grass. If you go with this type of design, take some time to look at a model. Pay attention to what a body looks like crawling or climbing out of the ground. This will add a taste of realism to your graveyard that will easily overcome those stale Payday bars you give out to all your trick or treaters. It’s definitely worth the extra effort to see your visitors just stand and stare, horrified, unsure if it’s really worth a stale Payday to come any closer.
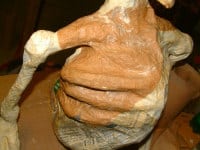
Corpse-sculpting
I like carpet latex. It’s cheap. It’s really sticky. It dries fast, and maintains its shape very well. Plus, I learned a new trick – corspe-sculpting.
After you’ve layed down your final skin layer, try this. While the latex is still wet, use a toothpick or a screwdriver to push the skin around to form wrinkles. Dig pits, draw crow’s feet around the eyes, drag lines across the lips. Latex-saturated paper towel is really pulpy and can be formed into all sorts of nasty blemishes. These remain when the latex dries!
Add extra bits of latex-towel-pulp around the eye sockets and pinch it to form eyelids, drooping skin layers, or whatever grossness you can think of. I especially enjoyed adding eye ridges. I dug an angry, furrowed brow with just a few strokes. You’ll need two or three layers of “skin” to really take advantage of this technique, but once you see how easy it is to add these details, you’ll wonder where the time went


Adding eyeballs is easy, too. Just wad up some news paper and shove it into each eye socket. Lay some bits of pulp to form eyelids and sculpt away. Oh yeah … I painted the eyes white. There’s nothing like that milky zombie stare to chill the blood of the audience and warm the heart of the builder when he sees how chilled his audience’s blood is.
A few more details
Here are a few more detail shots of Sam’s face. I decided to keep his original teeth (since I spent so much time playing with this new sculpting technique and it was getting late).
The veins and sinew are rolled up lengths of paper towel. You could use clothes line if you’re not all that interested in rolling up lengths of paper towel.
Those of you coping with a bit of obsessive-compulsive personality disorder may find this soothing. Or infuriating, in which case clothes line is a good alternative for you.
Paint the mouth interior black or a deep red. Shoot, you could even put a little red bulb in there if you wanted. Or a bird. I bet if you left this thing sitting outside long enough you’d find a nest of starlings in there before too long.
Paint your corpse with your favorite colors of latex paint, or wood stain. I tend to favor paint more than stain because of the added water protection. Any support structure that may be showing can be painted black.
And that brings me to sealer. I recommend that you seal your corpse well. I go into some detail on this subject with Walter . In a nutshell, we used acryllic floor sealer. It’s important to protect every inch of your corpse. The carpet latex will go a long way to keep your monster from disintegraiting, but a good coat or two of sealer will ensure that your corpse will be around for many seasons. Pay particular attention to anyplace that may collect water, and anything that’s in contact with the cold, cold ground.

“Have faith in yourself, but not too much faith. For if you succeed and prove yourself, having based your entire life on faith, you might suddenly disappear in a puff of logic.”
In other words, we hope you’ll take whatever you’ve found here to be useful and use it to build some seriously twisted props. And, if along the way you discover some really neat trick, share it with us!