
There are places online where you can purchase kits that contain all the materials you need to make your own Latex monster masks. I’m sure these are fine products, and if you’ve never done this before there’s nothing wrong with going that route. However, if you don’t mind doing a little scrounging, and if you trust your own creativity, then you can make three to five latex masks for around $50.
By the way, this project isn’t intended to make masks that can be worn. Instead, stuff them with newspaper or expanding foam and mount to props.
| Materials list | |
| Styrofoam head | Available in novelty, hobby, and art stores |
| Plastiline clay (Plastilina) | Available in hobby and art stores (oil-based & doesn’t dry out) |
| Plaster of Paris | Available at Home Depot and hobby stores |
| Liquid latex | Available at hobby stores and online (1 quart) |
| Paints | I used plain old Testor model paints & brushes (airbrush optional) |
Theory
Making your own monster mask is a very rewarding experience. The girls will think you’re all sensitive when they learn that you’re “sculpting” and learning how to make your own molds. That is, until they see the vile creature you’re actually sculpting.
The entire mask making process can be broken down into the following steps: Sculpting, molding, casting, and painting. There is a fair amount of work involved and you will need patience (especially when you destroy your first mold trying to de-mold it and have to chuck the whole thing into the trash).
Don’t be afraid of failure. Especially since clay and plaster are really *cheap*. Luckily, the hardest part of the project involves the cheapest materials. By the time you start working with the expensive stuff (Latex), you’ll already have your mold ready.
Sculpting

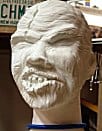
This isn’t really a sculpting primer. Plastiline (Plastilina) clay won’t dry out. You can work it and reuse it indefinitely. Start your project by covering your styrofoam head (or whatever armature you’re using) with clay. Knead handfuls of clay and mash them flat, then just squish them in sections all over your head (the styrofoam head, that is). Your goal is to cover the surface with somewhere between 1/8″ to 1/4″ of clay.
I only covered the front half of the head and I recommend that you do the same for this project. We’re only making a single-part mold (just the face), so don’t go back any further than the ears.
My first feeble attempt at sculpting was the “green goblin” shown below. He didn’t make it past the mold stage and got chucked into the trash. I changed clays (to Plastilina from stinky sulphur) and started over from scratch, taking time to pay closer attention to how the face is built.
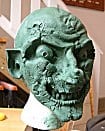

Stinky Sulphur clay
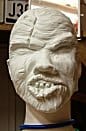
Plastilina clay
Use a mirror to get ideas about where things belong on your face. Don’t bother measuring anything unless OCD compels you, and if you can’t figure out how to do a particular bit, just have fun and make something up. If your neighbors don’t already think you’re crazy, sit in front of a mirror in your garage and sneer at yourself for a day or two.
Making the mold
This is the point at which your mask project will become a success or utter failure. I’ve experienced both. When you fail at something just try to think of it as a chance to repeat all your hours of painstaking work for little or no added benefit other than the knowledge that you had the balls to complete the project.
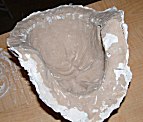
After your sculpture is complete, build up about a 2″ wall of clay around the head. Start at the top and work your way down to just behind the ears. Continue the wall down to your creature’s neck.
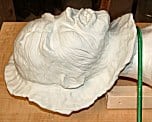

Mix your first batch of plaster in a large bowl or bucket to a consistency a little thicker than pancake batter. Coat the sculpture with hand soap to make de-molding easier. Brush on the first coat (called the detail coat). Make sure to spread the plaster over every surface. The plaster may slide off the face because of the soap. Don’t worry. Just keep dabbing it on.
Air trapped beneath the plaster will form cavities that will crack. They may cause the mold to break at worst, or cause un-planned deformities and pimples. You’ll likely get fewer casts from your mold, too. As the plaster begins to set up, work it with your fingers. Press it, smooth it, make it conform to the face.

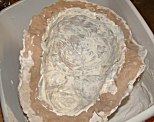
After the first coat is dry (about 24 hours), add a second coat. After that is dry, soak strips of cloth in plaster and apply them in a crosshatch pattern over the entire face and neck. This will add strength to the mold.
I added one more coat after the cloth strip coat. I suppose you can add several more coats to make the thing really heavy but the first coat was the most important one, and if you screwed that one up you’re doomed. Give your creation at least 2 days to cure before attempting to de-mold.
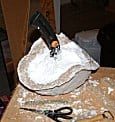
De-molding can be extremely frustrating. Especially if you break the mold. Don’t expect the plaster to pull right off the armature. In fact, sacrifice the styrofoam head. They only cost about $3.00 When you get all the styrofoam out, the clay will easily peel away from the cured plaster.
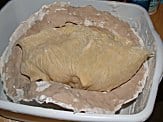
Pouring the Latex
If you have successfully removed all the clay without breaking the mold then congratulations! You did better than I did my first time. By the way, you can recycle all that clay. Just pick out any bits of workshop debris and rinse off any residual hand soap. Good as new and smells pretty, too.
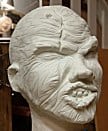
The mold you’ve just made is a negative image of your sculpture. What you’ve made is also called a one-piece mold. If you had been making a mold of the entire head including the area behind the ears, then you would have had to make a two-piece mold. I wanted to tackle one thing at a time before I invited extra frustration by complicating matters. That’s why we’re only doing the front of the head.
Trivia note:
The busts at Disney’s Haunted Mansion are negative images (like our mold) lit from beneath. When light hits the mold in this way, your brain gets fooled into thinking the image is convex. When you move your point of view the face in the mold appears to follow you. This alone might be a better effect than the masks you were going to make! If your mold holds up after casting is complete, you can use it in your haunt. Place it high up, light it from beneath (under the chin), and don’t let your visitors see the light source.

Brush the mold with hand soap, and make sure to get inside any deep crevices. Don’t go crazy with it. The goal is to make the surface slippery when it’s time to peel away the cured Latex. If you use too much soap it can mix with the first coat of Latex and cause your mask not to cure properly. (sigh…but I learned)
Once the mold (and outside lip) have been coated, brush on your first coat of Latex. I used a cheap hobby brush. The first layer is your detail layer, so make sure to get it in all the crooks and nannies (nooks & crannies). Also bring it out over the lip about 1/4″ or so. This will give you something to hold onto when it’s time to peel.
Let the first layer cure for no less than 1 hour then brush on a second layer. Repeat this process until you have 5 layers, then let the whole thing cure overnight. If you notice areas that aren’t yet cured (still white and squishy) then wait. You might see this in the tip of the nose or other extremity where the Latex settled. When everything seems to be dry, slowly peel the mask from the mold.
My mold had a lot of air pockets. The air pockets caused some of the surfaces on the face to peel away with the Latex when I pulled my first mask. I refilled those little holes with bits of clay and was able to cast several masks. Just kept refilling the holes. If you work your plaster enough you’ll have fewer holes, but if you end up with some it’s not the end of the world.
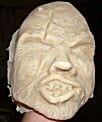
Painting your Latex mask
I don’t really feel qualified to give you advice about painting your Latex mask. There are lots of folks out there with more knowledge and experience than me. Your personal artistic ability and macabre predisposition are your best guides. For what it’s worth, here’s what I learned during the last phase of my mask project…
My first mask painting session was also my first time ever using an air brush. If you have the chance to learn how to use one of these things then do it. I quickly discovered this is not something you can just pick up. There is subtlety and finesse that I expect will take a great deal of time to master. Nevertheless, you can at least apply a base coat with one and do the detail work by hand.
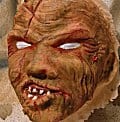
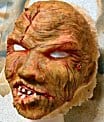
I used plain old Testor model paints. By the way, did I mention that you really shouldn’t try to wear this thing? These masks will end up on the north end of some props, but I wouldn’t want one stuck to my face.

I started with a nice base coat of thinned paint. Mix a drop of paint to about 3 tablespoons of thinner. Think white-wash. If you don’t have an airbrush to mess around with, use a small brush or sponge and dab the paint on in patches. It’s okay if the coloring looks uneven. This guy’s supposed to be dead, after all.
When you have your base coat down, repeat the process using different shades of brown or green. If you keep the paint very thin you can go back over the same area several times to shade certain areas.

Use flat paints unless you don’t mind your monster having a shiny face. Use high-gloss un-thinned red and brown to highlight features such as bloody scars and cuts. Casting imperfections can be turned into puss-filled sores. Use unusual colors like green and yellow thinned down and dabbed all over to cast an unhealthy glow on your monster’s face. If you want to cover more surface in a shorter time use a sponge. Just keep the paint thinned way down and have fun.

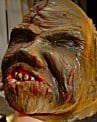
By changing colors and using different techniques (sponges versus brushes) from mask to mask you can come up with some really neat and different results. The last two pics on the right are of a second mask painted with different colors. When choosing colors to paint your ghoul, keep in mind where he’ll be stationed in your haunt. If it’s going to be really dark then he may not need much of a paint job at all. In fact, you could just mist the face with luminous paint and sit him in front of a black light.
Don’t sweat it if you don’t like the direction your paint job is going. Just paint over it. Keep your paint thin and use different tools like paper towels or Q-tips. You don’t *have* to be proficient with an airbrush to achieve really good results. Just use your imagination and be patient.
Conclusion
This project proves once again that boring, mundane (read cheap) materials can be turned into nightmarish creations. The active ingredient is your imagination. Of course all the hours you spent detailing your pet monster will probably be overlooked and taken for granted. Oh well. You’ll scare the crap out of a bunch of people in October so that should make you feel better.
Some folks questioned why I used plain old plaster of Paris instead of a product such as UltraCal 30 to create the mold. In short, because a box of common plaster costs around $3.00 and this is just a Halloween prop. Spooky’s recurring theme is essentially “do it yourself with the cheapest materials that will get the job done”. Now, this doesn’t necessarily apply to, say, a crank ghost motor. You can use an electric rotisserie motor to crank your FCG, (I have) but sometimes it pays to spend the cash and buy quality (I did). However, if you can fake it and still end up with a convincing effect, then fake it.