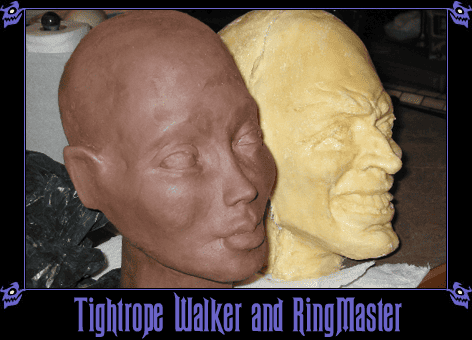
We fabricated our own latex puppet heads for the Madame Sarita’s Spirit Parlour black light puppet show. Here’s how we did it.
As with all Halloween projects, take safety precautions, or else you’ll be able to supply a ghost to your attraction the hard way.
Special thanks to Kelley for showing us the fine art of latex casting.
You Will Need
- Several pounds of iron-based clay
- Sculpting tools
- Several pounds of plaster
- A bottle of Mop ‘N’ Glow
- Some paste wax
- One package of cheesecloth
- Some makeup sponges (foam wedges)
- paper towels
- Several shallow plastic bowls (whipped topping containers are perfect)
- A large bucket
- Some disposable brushes and plastic cups
- Latex gloves
- Vaseline
- Dishwashing detergent
- A flat head screwdriver or other wedge-like item
- A hammer
- Scissors
- Drop cloths
- An oven
The Sculpture
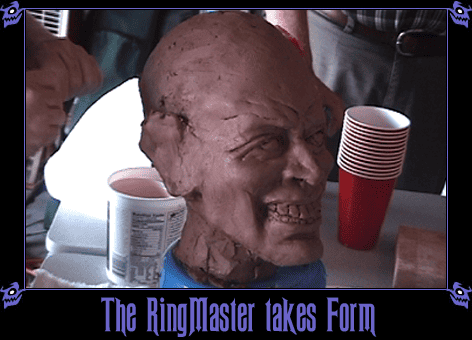
The first order of business is to get a sculpture to cast. We made our molds off of heads sculpted from an iron-based clay. Kelley was talented enough to sculpt the heads so that they were hollow – this made removing the clay from the molds much easier later, and required far less clay to build.
Generally, you want to avoid “undercuts,” or non-convex surfaces that will make it difficult to separate the negative from. Since we’re going to be casting in latex, we could have a few small undercuts, but they are still danger areas for bubbles in the plaster or missed areas in the latex, so even then, it’s good to avoid them.
Wider necks are easier to deal with than narrower necks. Because you will be reaching in to attach the two halves, a wider neck will give you more room to work with and see through.
The clay can dry out easily. If it dries out, it will make it more difficult to remove from the mold, and it won’t be reusable in any other context later. Always keep your clay sculptures and leftover clay wrapped in plastic garbage bags, and squirt them down with water from a spray bottle daily.
The Mold
Once you have a sculpture, you can set about making the mold. This will get messy, so be sure to have some drop cloths down.
Because we are casting a head, we need a two-part mold: one part for the face, and one part for the back of the head. If we tried to do it as all one mold, we would have a difficult time using it.
To achieve the two part mold, you need to make each part in a separate action. To define the boundary of the front part of the mold, you must build up a clay wall around the perimeter of the head, to create a surface perpendicular to the head to hold back the plaster.
Because you want to remove the clay later to leave a clean surface for casting, you want to lightly attach the clay wall, rather than pushing it into the clay surface of your sculpture. To give it strength against the weight of the plaster, you may need to reinforce the wall with some wads of clay shoring up the wall.
You also want to add “keys” to the wall, which are bulges in the clay wall that will help lock the two halves of the mold together in unique position. (If your wall was perfectly flat, the two halves could rotate against each other, and you couldn’t be sure you had a perfect match. With these keys, there will only be one way to put the two halves together: the right way.)
Mixing the Plaster
Plaster requires a particular proportion of water to plaster in order to cure. Luckily, there’s an easy way to mix the plaster without meticulous measurement.
Before you begin, rub Vaseline on your hands to protect them from the plaster and to make it easier to work with.
Mix your plaster in small, shallow plastic bowls which you don’t mind throwing away. Keep a pitcher of water handy, and have a large bucket of water nearby for washing your hands.
Start by pouring some water in a plastic bowl – three or four cups. Then, make sure your hands are not wet, and start taking handfuls of plaster and sprinkling it into the water. Work quickly, but try to keep the plaster powdered and evenly distributed on the water.
Do not stir the plaster yet. Just keep sprinkling in handfuls of plaster. Eventually, you’ll start to see little islands of plaster rising from the water. When you get a fairly uniform set of islands, stop sprinkling, and wait for a bit. If the islands sink under the water, keep adding plaster, but if they stay and start to cake up on the surface, you’re ready to mix the plaster.
Reach into the plaster and water and mix the plaster with your hand or fingers until it reaches a creamy consistency. When you have all the clumps worked out, your plaster is done.
Plaster doesn’t harden by drying – you have started a chemical reaction that goes through stages. The first stage is this creamy stage. The second stage is a thicker, frosting-like stage, and the final stage is a firm, solid stage. You need to do your work while the plaster is in its appropriate stage.
The Fling Coat
The first coat of plaster is your detail coat, because it is the one closest to the clay. Because of this, your first coat will be a “fling” coat. You literally fling the plaster at the sculpture, like splattering paint from your fingers, covering every bit of the exposed clay with this creamy plaster. You fling it onto the sculpture because this ensures that there are no air bubbles and that it gets into every nook and cranny of your sculpture. Work quickly, because if the plaster reaches its frosting-like stage, you won’t be able to fling it any more.
Once you have covered your sculpture, wait and let it cure a bit. When it is no longer liquid, you can spread the rest of your clay-like plaster on as a second coat.
Subsequent Coats
Mix up more batches of plaster to build up the strength of your mold. For later layers, you can wait until the plaster gets to its frosting-like stage, and then just spread it over the sculpture. Pay particular attention to the edges of the mold, because you will be applying pressure there to release the mold later and you don’t want it breaking.
As you spread the frosting-like plaster across the mold, you can tap the plaster into crannies in order to coerce any air bubbles out. Try to avoid any air pockets in your plaster because they make your mold weak and may introduce unwanted errors in your castings.
Keep building up layers of plaster, and don’t pause for too long between them – if the plaster fully cures, it will weaken the bond between your subsequent layers. When you have a couple of inches of depth all the way around your sculpture, you’re done. Let the plaster cure, and start on the other half of the mold.
Wash your hands off in the bucket of water. The plaster will eventually settle in the bottom of the bucket, leaving you free to ladle the water out and discard the plaster. Be sure to re-apply the Vaseline before digging back into the plaster.
The Other Half
When the plaster is dry, you are ready to start the other half of the mold. Carefully remove the clay wall and its supports so that all that is left is the original sculpture and the plaster around its front half. You may have to smooth out some areas where the clay wall was touching the sculpture.
If you just start putting plaster on the other half of the head, you will have no way to separate the halves, so you need a “release agent” to assist you in separating them.
We used “slip”, which just means “really watered down clay”. Take a plastic cup, throw in a hunk of clay, and add water. Stiring it, you will end up with what looks like dark brown muddy water. You may have to add more water or clay to make it a nice opaque brown. This is the “slip”. Take a paintbrush, and brush the surfaces of the plaster with slip until it builds up a thin but complete coating of clay (the plaster will basically look like clay when you are done).
This thin layer of clay will act as the release agent later when we go to separate the halves of the mold. Now you can follow the steps above to cover the other half of the sculpture in plaster. You will end up with a big ball of plaster, encasing your sculpture, with a razor-thin layer of clay between the two halves of plaster.
Separating the Mold Halves
Once both sides of the mold are dry, take a rasp and shave down the plaster around the outer perimeter. You will see a thin hairline of brown separating the white. This is your line of slip that you painted earlier, and this is where you want to separate the two halves of your mold.
Take a flathead screwdriver or other wedge-like item and lightly hammer it into the line, slowly working around the perimeter of the mold. When you get completely around, work deeper into the groove you cut. Eventually, you will force the two halves apart, and your mold will separate into two pieces.
Remove the clay sculpture (you’ll destroy it in the process, so don’t even try to preserve it) as best you can, and wash the remaining clay out of the mold with water and brushes.
Preparing the Molds
Your plaster molds will still have a lot of moisture trapped in them, and you want to release that. The fastest way is to pop them in the oven for several hours. Leave the oven cracked open a bit to allow the moisture to escape. The best way to tell when the molds are done drying is to hold them up close to your face (not touching!) – you will be able to feel the humidity coming off of them if they aren’t dry yet.
Once they are dry, they are ready for treatment. Basically, you want to treat the plaster with something that the latex won’t make a strong bond to. You can use Mop ‘N’ Glow to treat the molds for easy releasing.
Get a disposable brush and paint the mold surfaces with the Mop ‘N’ Glow. The plaster will soak up the Mop ‘N’ Glow readily. Let the molds dry between coats (the oven works quickly for this, too), and keep adding coats until the plaster no longer sucks up the liquid. Once this dries, your mold is complete!
Making a cast
o make a cast, you will want to add another release agent – paste wax. This forms a nice seal between the treated mold and your latex. Take a brush and load it up with wax by swishing it around on the surface of the wax. You can then paint the surface of the mold with it. If you’re making multiple casts, you’ll want to do this every time (you only have to do the Mop ‘N’ Glow once).
Once you have a thin coating of paste wax on the interior of the mold, you are ready to start painting the latex in.
Painting the Latex In
First, get a plastic cup and fill it half-full of water, and pour some dishwashing detergent in there. Dip your brush in it and swish it around, and then pull the edge of the brush along the rim of the cup to get most of the water out. This loads your brush with a coating that helps keep the latex from sticking to it and making it a stiff wedge instead of a brush.
Dip the brush in the latex, and start brushing the latex on the inside of the mold. You want to get a nice, thin layer with no bubbles or pools. Bubbles and pools will come out as weak spots in your casting, or as errors. Bubbles leave air pockets, while pools will have the surfaces dry over, leaving the latex underneath wet and sealed in – if the latex doesn’t dry, it won’t hold the form you want.
Allow the latex to dry. It should dry to a translucent yellowish color. If you notice any white pools, just break them open so they can dry.
Some latex batches take longer to dry than others. On our latex heads, we had some coats nearly dry by the time we finished painting the latex in the other half of the mold, while other coats took almost overnight to dry. Be patient, and wait for the latex to dry before proceeding.
Keep adding layers of latex in this fashion to build up a solid layer of detail latex. We used four layers of straight latex in our puppets.
Strengthening the Latex
Once you have four layers of latex in, you can start to strengthen the latex with cheesecloth. Paint the surface of the mold with latex as you did before, lay in a layer of cheesecloth, and paint over the cheesecloth with more latex to seal it down. I found that the cheesecloth is difficult to control unless you load your brush with latex, push it into the center of the cheesecloth to get it saturated in the middle, and then slowly drag the brush off the cheesecloth.
Cut the sections of cheesecloth to fit the size and contour of the area you are covering, and have adjacent pieces of cheesecloth overlap each other for strength. Pay particular attention to areas that will get a lot of strain, such as the mouth for articulated puppet mouths, or the neck if fabric is going to be attached.
Since cheesecloth doesn’t compress well, consider supplementing the cheesecloth with makeup sponges in tight squeezes, like in the tips of noses.
Continue adding layers of cheesecloth until you have the desired strength. We used three layers, and it provided a very strong cast.
Attaching the Halves
The hardest part of this whole process is attaching the two halves from the inside. You may not have this luxury if the neck is too small – you may have to settle for sewing the two halves together after de-molding. But if you can get your hands inside the mold, you can attach them from the inside for best results.
First, you need to attach the two halves together. We just cut grooves in the outer plaster to accommodate several lengths of twine that we tied the two halves together with. You could also use bungee cords or a clamp.
Once the halves are attached, start brushing in layers of latex along the seam. This is difficult, working through the neck, but wearing latex gloves helps keep the latex off of you.
You want to follow the same scheme as you did for the halves – in our case, four coats of latex and three more with cheesecloth – although you may get by with less depending on the strength requirements.
De-Molding
Once all the latex has dried and you’re no longer going to add any more layers, it’s time to de-mold! All your hard work pays off at this moment.
Start at the neck, and slowly work the latex away from the plaster. It should tear off fairly easily. Work slowly into the head, pulling the latex away from the plaster on one half of the mold. When you get it sufficiently pulled off, you can undo the two halves, which makes de-molding the other half much easier.
And voila! Your latex head is complete.