Making your own skull mold isn’t as hard as you might think. A little bit of money invested into a mold will reward you with many skulls that can be used in endless ways.

I’ve made a few molds using Dragon Skin by Smooth-On. Dragon Skin is a soft, super stretchy silicone rubber. It stretches without tearing and always rebounds to its original shape without distortion. Smooth-On’s website has a great picture tutorial you can follow that explains how to use Dragon Skin, step by step. It’s worth a read. That being said, I didn’t follow it, I was shown how to make a mold using it while at FrightfestBC.
Making a Skull Mold:
- Have your work area ready.
- Have your supplies ready.
- Allot yourself some time.
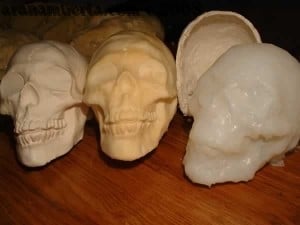
A trial sized pack of dragon skin is just the right amount for a skull. The pictures below show two different molds and skulls but hopefully give you an idea of what to do if you want to attempt this yourself.
You need:
- Skull for the mold
- A board to sit the skull on
- Disposable cups
- Popsicle sticks
- Paper towels (its a messy process)
- Plasticine
- Dragon Skin Part A and B
- Thi-Vex II
- *Pigment (I didn’t use)
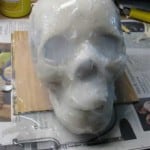
Get a board ready put some newsprint or plastic or something down under the board if you are concerned about you work area. I use a small square board of left over flooring. Inspect your skull to be molded. If it has any hollow areas or deep undercuts you will want to fill those areas with Plasticine or similar. (these pictures are from two different mold making sessions)

Take care to smooth it out really well and make it look good because once you mold it, every skull will look as this one does, right down to the small bumps and scratches. A release agent is recommended, but maybe not necessary as dragon skin will only stick to itself and to cloth. (Don’t wear anything you’ll be upset about ruining) I didn’t use a release agent for either of my two skulls with no problems what-so-ever. When the skull is ready to your liking place it on the board with it’s chin over hanging the board. This allows you to coat under the chin.
Another note… the temperature and humidity of the room you are in will affect your set up time. As I have both times made my molds in a cool environment (outside, and in a shop) the Dragon Skin took a long time to set up. Maybe that isn’t so bad, if you are just beginning with this stuff as it gives you a lot of time to apply it… well, maybe…
To begin – get two separate disposable cups or similar for measuring parts A and B.
LABEL THEM, PART A, PART B
Get a popsicle stick for each of these cups.
LABEL THEM PART A, PART B
The last thing you want is to get any of these mixed up, so label them to ensure they stay separate.
Have a third cup and popsicle stick ready for mixing the two parts together.
For your first application you will basically be covering the entire surface of the skull in the Dragon Skin without any thickener added. You are concentrating on covering all the detail areas, like the teeth. You are aiming for a thin but COMPLETE cover of Dragon Skin to pick up all the little details.
For my first layer I used approximately a 1/2 cup of Dragon Skin (approx 1/4 each of parts A & B) and it was JUST enough. You may want to use that amount, or a little more. Just adjust your measure cups to suit. If you want to be accurate you could fill a measuring cup with water and add it to your PART A cup and draw a fill-to line, HOWEVER make sure that you dry the cups very well before adding the Dragon Skin. Make sure to read all the bottle directions before you begin as well. Part B is to be mixed up before using with part A.
I did not use any pigment, but it’s recommended. Coloring will indicate when you have fully mixed the two parts together. Colored layers will aid you to get even coverage and will help you differentiate between coats. If you feel that you may not mix it completely or may miss an area while coating your skull, or are uncomfortable skipping this step by all means get some pigment to add.
When applying each coat keep in mind that the new layers must be added while the previous ones are still tacky. If they dry completely the new layer may not properly adhere. Silicone will stick to silicone even after it is fully cured, but it MUST be very clean. The best bond will be achieved when the previous layer is tacky, but if it happens to cure up fully, it will still stick.
Measure equal amounts of A and B into their separate cups. Check them to ensure they are equal. Pour them into your 3rd cup scraping the sides of the cups with their designated popsicle sticks to get ALL the Dragon Skin. MIX THOROUGHLY in your 3rd cup. For three or so minutes… until your hand feels like its about ready to fall off… well, ok that’s what mine felt like.
When you’ve mixed the 2 parts well, take the popsicle stick and smooth the Dragon Skin over your skull. I first coat the detail areas, then pour small amounts over the top of the skull and smooth it down. This layer will pretty much self level, and also run down your skull. I take my stick and pull some back up as it runs down the edges, but having some pool at the base is OK. Don’t forget under the chin.

This will need to set up for a while. Check it often, it could take 20 minutes but it could take up to an hour to set up if its cold where you are working. You want to add your next layer when the first has set up and is still tacky to the touch.
For your second layer measure more of A & B increasing the amount of each to up to a 1/2 cup of each. Mix them together as you did previously and then add a small amount of Thi-Vex II, approximatley a 1/2 cap or more depending on how thick you want it, to thicken your Dragon Skin. Mix this in just as thoroughly. It will be thick like peanut butter. Apply this layer to the entire skull, including the chin. Make sure you coat right to the base, even onto the base slightly. This coat may take a little longer to become tacky.
Repeat this process for a third and fourth coat. Try to get all areas even.


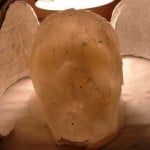
Once completed, leave the mold to cure overnight. Do not de-mold the skull, resist the urge to peel it back and peek.
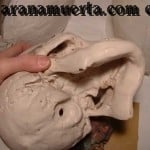
Remove it from the board by peeling the Dragon Skin away from the board. It is going to take some work to get it started. Only remove the mold from the board – do not take the mold off of the skull. You’ll need to make a mother mold (or shell) first.
The mother mold is necessary to retain the shape of the mold while making copies. This is especially important when working with expanding polyurethane foam to cast with.
You can use a variety of techniques and products to make a mother mold. The lady who taught me about dragon skin now makes all her mother molds from fiberglass. I have also seen some nice looking products online I would like to try.
I used Plaster of Paris for this one, which works, but I would love to try something else next time.

To make one like I did you’ll need:
- Plaster of Paris
- Water
- Gloves
- Measure cups
- Clean container for mixing
- Popsicle stick or similar for mixing
- Cheesecloth or an open weave material
- Scissors
- Plastic wrap or a thin plastic bag
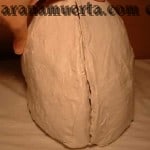
To begin I inspected my skull mold and drew a line down the approximate center of it, from front to back
Next I got everything prepared:
– I applied the plastic wrap along the drawn center line so that it overlapped onto each side of the skull. This layer of plastic will keep the two halves of the mold separate.
– I cut up my strips of material. I kept the strips to about 10 inches long and about 1-1 inches wide. Some smaller.
– I mixed up a small batch of the plaster, following the box directions
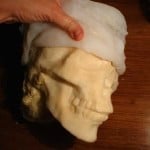
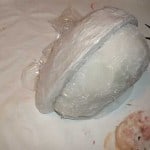
I used the center line I had drawn as my guide and dipped the material strips into the plaster of paris before applying them to one half of the skull. I kept applying the strips until I felt I had a nice strong uniform layer. Next I took the plastic wrap which was laying on the unfinished side if the skull mold and folded it over top of the finished side to create a barrier. By folding the plastic wrap over, the mold is formed in two separate halves that will fit together well and come off easily when complete.
I repeated the same process for the second half of the skull.

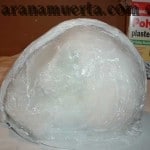

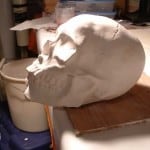
I left the mold to dry overnight. Then removed both halves by pulling them in opposite directions. They came away from the mold very easily. I gave them each a coat of regular white house paint to help keep the plaster of paris from eroding along the edges during handling.
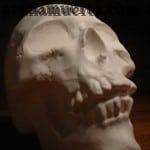
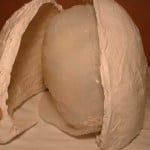
Dragon Skin mold with both halves of the new mother mold.
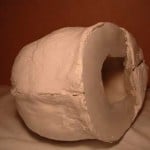
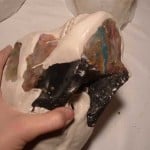
Bottom View

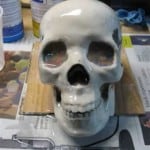
I then could finally remove the skull from inside my new dragon skin mold.