

When my family began to get serious about scaring our neighbors, we used to sit, kneel or stand in our front yard and pose as monsters, witches, vampires, etc. We used to love to listen to the crowd trying to figure out if we were people or mannequins, and when they let their guard down, we would reach out to them and freak them out.
Since our production has required more people, I now populate my graveyard with monsters that I make myself. My monsters are fun to create and dress up and they provide great photo opportunities for the people who come by on Halloween. I always set one of them up near a sidewalk so that people can stand next to them and take pictures. Did I forget to mention that people love to bring their cameras?
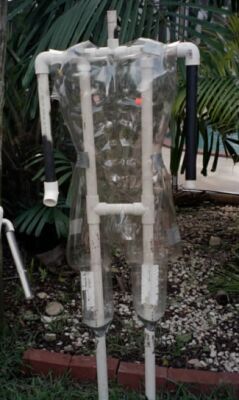
The Frame:
The Monsters’ frames are created out of 1″ PVC pipes. They’re very inexpensive and easy to cut. (Just don’t inhale the dust….it’s really nasty!) To ensure that you’ll be able to take your creation apart, spray the ends of the tubes with a bit of lubricant (WD40). Use your own body to measure the length of the arms. legs and torso.
Use 90-degree joints to attach the shoulders and 45-degree joints for the elbows.
Use “T” joints to attach the (outer) neck area to the tubes leading down to the torso and to attach the torso.
For the neck, use an upside down “T” joint to connect to a 1/2″ wide pipe in the center. Attach a 1/2″ wide PVC tube (approx. 6″ long ) to the middle of that one to insert the wig head with a mask.
The hands are attached by either duct taping them on or filling them up with foam and inserting the PVC tube into it while it dries.
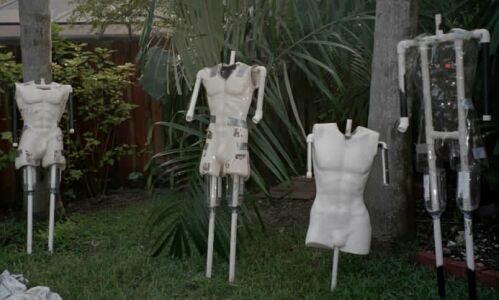
The Torso:
For the torso, I use the plastic body molds that are sold at mannequin supply stores. These are lightweight, look very realistic and stack up when Halloween is over. I take two torsos and tape them to the front and back to make a rounder body but it isn’t really necessary.
You can purchase these torsos online. Just do a search for Mannequins and body forms.
For thighs, cut the bottoms off 2-liter soda bottles then cut the tops off of them. They should fit snugly into the pvc pipes on the legs. (You’ll need to practice to get the holes tight enough to stay on the pvc pipe.) Insert enough bottles so that they stack down to the knees and tape them in place.
For the arms, use smaller soda bottles and stuff the rest of the shirt with newspaper or towels. (After Halloween you can toss the soda bottles in the recycling bin!)
The Head:
Use wig heads and attach them to the PVC tube coming out of the neck. Paint the eye area and the neck area of the wig head with paint to match the mask that will be used. If the mask has large openings for the eyes, add eyeballs. With the mask in place, cut out eye sockets in the wig head and attach eyes that can be purchased in a Halloween supply store. Then touch up the eye area again.
The Clothing:
I purchase my monsters’ clothes at a local Goodwill store. Rip them up a bit or slash them up with a razor blade, wash them in mud, and hang them out to dry. When you dress them, they look like they just walked out of a grave and usually smell very musty.
How to stand them up:
I use a mallet to drive two 3/4″ PVC tubes into the ground so that I can slip the monster’s legs right over them. I simply put shoes in front of the tubes, underneath the pants.


In this picture, I’ve ripped up some curtains and washed them in mud. By hanging them on the outside of the window. It gives the impression of being an old and haunted house
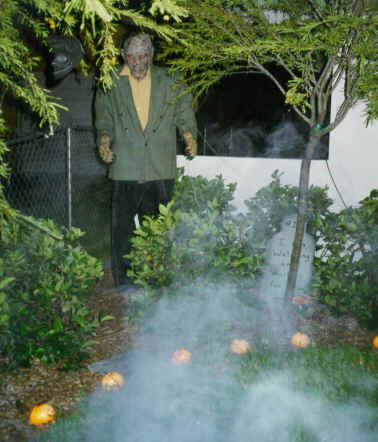
Here is our monster in the graveyard with the fog.

This is a half of a torso stuck in the ground.
We stood this monster up by the sidewalk. He didn’t mind posing for pictures!
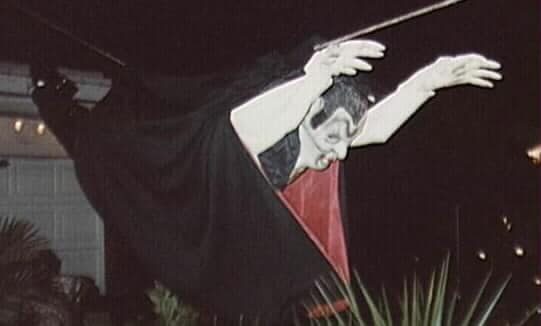
The “Flying” Vampire wore a fancy tuxedo shirt, shiny dress shoes, and a beautiful cape. We suspended him between two trees and it looked as if he were flying over the cemetery towards the people on the sidewalk. (The Vampire didn’t fly but his cape flapped around a lot in the wind!)