
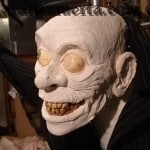
Mr. Hemlock Dench is my cemetery grounds keeper or caretaker.
He is a knavish, creepy little man. Bow-legged and hunch-backed, he grins fiendishly out into the darkness at passers by….

Mr. Dench was my first project for 2007. This was the first full bodied prop I attempted. He is made almost entirely of recycled materials.
Making Hemlock Dench
I made Hemlock to enter in the Prop Contest on HauntForum, so I had to keep cost in mind while building. Building a prop cheaply is easier said than done. You can find yourself creatively limited and rethinking your design to accommodate the price.
I began with the face, using a foam skull I had made years previous. These skulls are easy to make and very cheap.
I decided the most cost effective way to tackle this was to mold a face around the skull, and make a mache mask casting. This way when forming the face I wouldn’t need to use as much paper mache pulp to build up the face features, and cut costs.
I covered the entire skull in tin foil, to keep anything from sticking to it. Then I used plasticine to form a rough face. I put a plastic bag over the face and applied a few layers of basic paper mache over it to form my mask. After it had dried thoroughly I removed it.
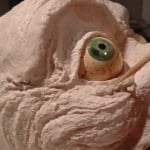
Then I removed the plastic bag, gave my son back his Plasticine, and stripped the tin foil off the foam skull, setting it aside for the eyes.
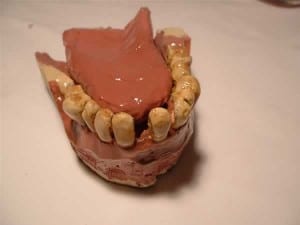
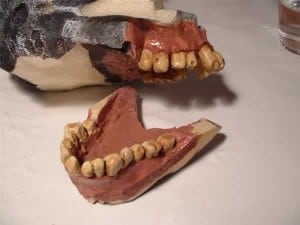
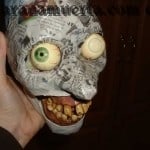
Next I took a very sharp knife and cut the lower jaw off the foam skull. I carved out all the spaces between the teeth on the upper and lower jaw and knocked out a few.
I painted the teeth and gums. After I was satisfied with the paint I added a thin coat of Spar Varnish. Next I made a tongue to fit inside the lower jaw out of masking tape and paper mache. I didn’t know if I was going to have the tongue showing at all, but I thought I might as well add it just in case. It only took a few minutes to form. I painted it with the same paint as the gums.
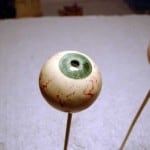
Eyes.
Cheap eyes. I made polymer clay eyeballs. The insides of each eye were the left over tin foil from the skull.
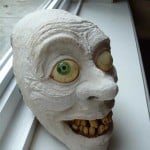
Next I cut out the sockets and put together -skull, teeth and mask over top, it wasn’t sitting quite right. So I shaved off some of the bone structure of the skull, and everything fit better
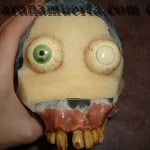
Then I taped together everything I had made. Once secured, I added coarse mache pulp to build up the face features, and then used a finer mache pulp to get some detail. This process took some time, as each layer had to be left to dry thoroughly. My main tools: my fingers, and a bamboo skewer.
I added ears using tin foil and masking tape and more mache pulp. Once I had the basic shape of ears, I taped them into place, and then built up the detail using pulp mache.
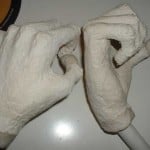
The Hands.
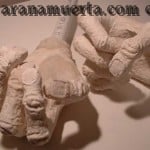
I had to figure a way to make hands for very cheap. I used packing peanuts because I happened to have some from a package I received in the mail. I taped them together to form the shape of hands, using 5 pieces of florists wire cut in half, one for each finger. I secured a 45 degree PVC elbow joint at each wrist. Then I used my mache pulp to build up the hands. This was done over a few sessions, as the mache needed time to dry between applications.
I formed a body from PVC. With my heat gun I warped his back to give him a hunch and his legs to make him bow legged. After tinkering with his stance a little I secured his limbs and positioned his head. Then I added some mache to form his neck. And bulked out his body with newspaper, bags and masking tape. I coated his body with a thin layer of mache and blended his neck and arms in with the remaining mache pulp.

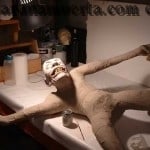
Then I painted him. I use mostly acrylic paint from the mis-tint section of hardware stores, its very cheap. To these I add other acrylic paint to get the base colors I want, and I free hand mix the rest as I go.
Clothing
I made his pants and shirt from rags and some filter cloth. I tied the shirt material on, it’s a big knot on the back, and his pants are basically tubes formed from black filter clothe, which I then stapled together… pretty low tech. His jacket was from my own Halloween costume a few years ago.
His hair was originally part of a witch’s hat that did not survive our 2005 party. His eyebrows were made from a cheap disposable paint brush. Gluing hair on is not my idea fun… I almost left him bald.
His lantern was scrounged from my mother in laws basement while she was doing some early spring cleaning. I added some paint to tarnish it up. Before Halloween I will redo his lantern to remove the real flame and make it safe, but for the Prop Challenge it has to stay as is because of cost.
I was walking out back to find a stick for him to hold, and passing the fire pit I saw that my spouse had broken a rake, and the top of the handle was in the burn pile. I brought it up to the house and cut it to size.
Definitely helped finding trash to incorporate into this project! I’m happy with how my new repulsive grounds keeper turned out.
On a personal note…
Thank you to Kurt for naming him and constantly telling me to get off my a$$ and make a prop.