


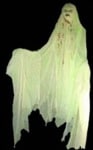
I was fortunate enough to find a web site here on the internet that gave some general plans on how to build your own apparition which looked under blacklight to be a ghost animated in mid air, designed by Doug Ferguson. I decided to undertake the assembly of this lady of the darkness and upon completion I was quite happy with the end result. Yet since it was built out of a sheet of 3/4″ plywood nearly 4′ square, it was so heavy that it was very difficult to move and store. There had to be a better way to build it and in April of ’97 it came to me.
What you see here is the first collapsible, portable floating ghost platform ever built. Using just 19 oz of aluminum this entire assembly weighs just over one pound over the weight of the motor! Easy enough to build in one hour, this platform folds down small enough to store in a western shoe box with the turn of one wing nut and two seconds. Here’s how I did it.
First things first I will give you a shopping list to make this as simple as possible for the project.
(1) 1″ x 1″ angle aluminum, 19″ long
(2) 1″ x 1/4″ flat aluminum, 19″ long
(1) 1/2″ x 1/8″ flat aluminum, 8″ long
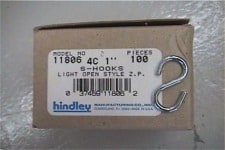
(6) 1″ Light Open S hooks
(2) flat head machine screws, 10-32 x 3/4″
(1) 1/4″ U bolt (wire / rope clip)
(3) medium strength eye hooks with wood screw threads (for ceiling)
(1) motor; 6.5 RPM TYPE E
(3) 24″ lengths of black cord (suspend the platform from ceiling)
(2) 36″ black coated fishing leaders w/ clip ends
(1) 18″ black coated fishing leader w/ clip ends
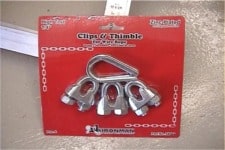
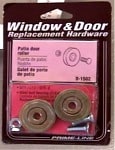
(1) 1 1/4″ patio door roller, Prime-Line #D-1502
(1) 1/4″ x 1″ bolts
(1) 1/4″ wing nut
(1) AWG 16 x 2 extension cord
(2) insulated 1/4″ female terminal disconnects
(3) zip ties
(2) 2 volt LED (Radio Shack No #276-209 T-1 3/4 size (5 MM)
(1) 5 volt flashing LED (R.S. No #276-036c T-1 3/4 size (5 MM)
(1) 9 volt battery
(1) 9 volt battery outlet
(1) 18″ blacklight with fixture
(2) 4′ x 8′ (or one 8′ square) cheesecloth
(7) wire coat hangers or equivalent
(1) Black paint (acrylic)
(1) Green fluorescent paint
(1) One Styrofoam wig form
(3) Single wheel miniature pulleys
Since this is extremely simple to make, you will need only a drill, soldering gun, needle nose pliers, a few drill bits and a crescent wrench for it’s construction. Budget roughly 4 total hours for build time.

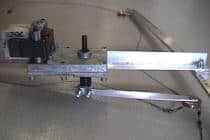
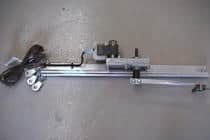
Since my idea was borne out of making this not only simple to build, but lightweight first and foremost I decided on using aluminum for the entire construction. In our first photo you will see the detail needed to drill holes in your 19″ section of angle. It is important to note here that this how to is based on an ECM 6.5 RPM, 2 AMP motor. If you cannot find an ECM then you will have to locate your own spacing for holes in your motor platform for attachment. But the idea is just to locate it around on center to this angle section that will allow your drive arm enough space to clear the marionette’s head line.
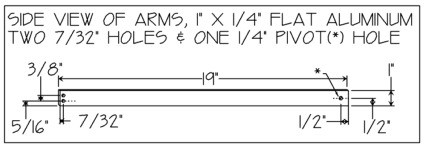
Here are the locations of where to place three holes in it’s two arms that will fold out to form the T needed. The first prototype was made with angle for the arms, but this is a bit easier to build with flat stock.
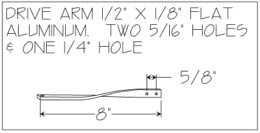
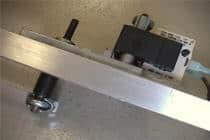
Next we need to make the drive arm that will attach to the motor itself. In the original plans the suggested length of this arm was 24″ long. After many different lengths that I tested, I came to the conclusion that the ghost just didn’t act like what I thought a hovering ghost might really look like with such a long travel. So ultimately I cut this down to the 8″ you see here. Today, 8″ to 10″ is now considered the ideal drive arm length in the haunt industry which came from this project. As you can see here we are using 1/2″ flat stock aluminum for this. 3/4″ stock would work just as well but in the event the arm becomes entangled in something, the 1/2″ arm can bend or break off, averting possible serious damage that a motor this powerful could cause. I look at this size material as a “breaker switch” if you will for this exposed drive arm. You will need to clamp this in a vise and use a crescent wrench to give it half a turn so it is on a right angle to each end. Next we assemble.
In this shot you can see we have attached the motor to the motor mount angle portion of the platform on one side of the motor only. Don’t be worried that you need to support the motor on the other side, as the angle mount is more than strong enough to keep this from flex of any kind during use. Use two 10-32 X 3/4″ flat head screws that have been counter sunk on the underneath side so the heads are out of the way for the arms to fold back for storage.

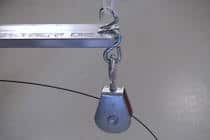
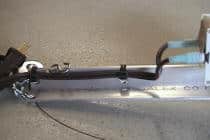
Next we move on to the wheel that will drive the marionette. In the original plans a washer held between two nuts was used as a swiveling wheel for this drive element. However, since that can wear quickly from friction as well as squeak from the metal rubbing together, here we will be using a patio door roller with a sealed ball bearing center. Use the bolt and nut furnished with the roller to attach to the bottom end of the drive arm as shown in this photo with the nut on the bottom side.
Next you will need to drill three very small (5 /64″)holes in a triangle pattern on the bottom side of the roller. Clip each of the three fishing leaders (black plastic coated steel leaders as shown here) to these holes in any order. Substitute black braided fishing leader for the steel leader if you can’t find the type shown above and attach your own swivel clips to the ends (like the Eagle Claw interlock swivels #K-LSS-7).
If you will be setting up your ghost outdoors, you will need to substitute a heavier black cord that cannot get caught between the pulley wheel and the pulley casing and break due to the wind whipping the lines side to side. I find that black parachute cord works ideally for this.
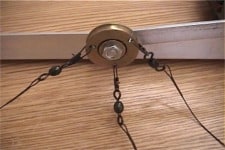

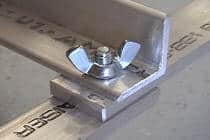
Now is a good time to attach the two platform arms. Place the 1/4″ bolt through the ends of both arms and then the platform, tightening down with the wing nut. At each end of the arms and at the back of the motor platform you will need to attach your S hooks. One to attach your cord to which will suspend it from the ceiling, the other to attach our pulley. Not clearly shown is the 24″ length of cord being used to suspend our platform assembly 6′ off the ground with a standard 8′ high ceiling.
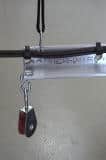
As you can see I crimped only the end of the suspending S hook that is attaching it to the arm, making this incredibly easy to set up and take down. Here is a shot of the back of the angle portion of the platform where we have one S hook hanging down to suspend the marionette’s head line. Above you can see that we have another S hook in the top hole, just barely above the power cord for suspending the back portion.
Next, chop the female end off of your power cord and crimp insulated 1/4″ female terminal disconnects to each lead and plug into the two male fittings on the back of the motor. Use 2 zip ties to secure the power cord to the side of the platform as seen here.

And there you have it. When you are finished it will look like this when it is folded out for use. Due to the construction of our platform, the arms can be moved slightly back as shown here in the photo on the right, they can be straight out to each side, or slightly forward, depending on the size of the ghost you are animating.


And here is our Ultimate Floating Ghost platform when fully closed with the instant twist of loosening the wing nut and folding back the arms. Retighten the nut to keep it in this position for storage. Make no mistake about this construction being flimsy due to it’s simplicity and light weigh! This thing is as solid as a rock! I have flown the Ultimate for hundreds of hours with no problems, even using heavy blown-plastic skeletons which this will easily carry if you are using the powerful TYPE E motor show in this how-to.
In the next step we will address your ghost. Now is a good time to hang your Ultimate from the ceiling so you will have the puppet strings (leader) to attach the armature (skeleton) to, which will make your build much easier. Use the three eye hooks in the ceiling on a triangle that matches the UFG’s three connecting points at the back of the motor mount angle and the ends of the arms. If you don’t hit a wood stud in the ceiling at these locations you would do well to use a sheetrock anchor to screw the hook into. Now suspend the platform assembly using three 24″ black cords. This will place your ghost at almost 6′ at the highest point and just under 5′ at the lowest during flight.

Here is an illustration of what I believe to be pretty good dimensions for building a wire upper torso for your ghost based off of Ferguson’s original suggestions on this prop with some changes I feel can be significant. At once you will notice that this skeleton isn’t just flat in front, hanging down with no “body” at all. I have added the dimensions here for you to enhance your ghost. As was passed along to me, I will also suggest using coat hanger wire for this construction. It is light and strong as well as easy to use. If you are wondering where to get them, you can always find bundles of these for a little bit of nothing at the local Thrift Store.

We’ll start with the shoulders. As you can see from the overall photo above, the distance from the shoulder joint to the top is about 11 1/2″. At the top of the spine which will be the top of the head be sure to make a small loop for your line clip to fasten to. Next bend a piece long enough to make the breast shape you see illustrated that is protruding outward and downward about equal distances. Use your own judgment here. Make sure that at each shoulder there is an open eyelet large enough for your arm section to move hinge here without binding. Next make two sections that will finish in length at 10 1/2″ for the upper arms, remembering to thread one end into the shoulder socket before closing that end up.
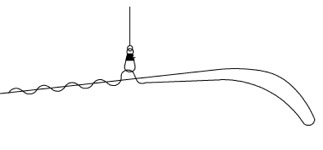
Next you will want to make two forearms that are 11″ from elbow to wrist, but then continue on 3 additional inches to form an elongated circle at the end we will be using as the hands. Since I have seen these ghosts fly with and without hands of all types, I like the look of a hidden hand that keeps with the wispy appearance of the ghost the best. At the wrist it is important to leave a loop large enough to attach the marionette line clip. Be careful in your joints that the end of the wires you are twisting together are not jagged enough to catch and tear your robe later.

Once you have the upper torso together, wrap another single piece of wire around the middle of the neck that will be long enough to make about three winds around the main spine and then stick out each side about 2″. You will also need to make each of these tabs stick out backward of the spine for about 1/2″, the same distance as you will be inlaying this armature inside of the wig form head. Now is a good time to hang your ghost’s skeleton from your leaders attached to the Ultimate platform. The 18″ line will be attached to the head and of course the two 36″ lines go to each wrist.

In the terrible photo here you can see the back side of our ghost that has been fitted with a wig form that has been cut in half. Since your ghost will likely only be seen from the front in a controlled environment due to the blacklight that will be illuminating her, not having fullness at the back of the skull is a non event and most importantly it reduces weight that your motor will have to be lifting. If yours will be seen from all sides then obviously you will need to skip that step. This also makes it simple to insert the LED eyes through to the eye sockets from the back as I did here. As you can see I cut a path in the back of the wig form to match the form of my wire using the tip of a hot soldering iron guided by the wire itself. This will allow for an inlay of about 1/2″ to 3/4″. Through the wire tabs I screwed the wire to the head. I used 2″ bugle-head drywall screws with coarse threads for this and feel the attachment is exceptionally secure. I believe that hot glue would work just as well.

The wires you see going into the head are for the LED eyes as mentioned earlier. The Ultimate concept of this design doesn’t lend itself to the color-organ driven eyes Ferguson fitted his ghost with in his detail, so we are going for something much less bulky. In the draft here you can see the way to use one flashing LED and one regular LED to create flashing eyes that pulse together in unison. Solder the two middle legs together as shown and simply run one wire from the first LED to a 9 volt battery, and the other wire that is coming from the other to the other post of the battery.
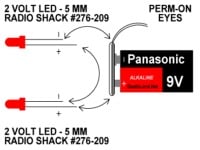
The small battery then can be fitted right inside the foam wig form in the back and held in place with a piece of wire bent into a shape to cradle the small amount of battery extending out of the wig form. Attach to the styrofoam with eyelets on each end with 2″ drywall screws as we used to attach the head to the marionette itself. For non- flashing eyes, simply purchase two of the 2v LEDs as shown in this illustration. The reason this will work even though 2v+2v=4v is because these LEDs will work at 4 volts minimum, but have a maximum of 12 volts each.
Before going further I recommend painting the entire skeleton flat black so it will fully disappear when under black light.
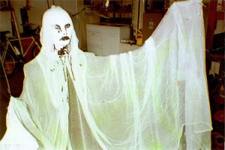
Now for clothes. The cheesecloth I used came from the paint supplies department of my local Home Depot. If you are also left with only small pieces like I was, simply sew these two pieces together by hand to make a single piece 8′ X 8′. Instead of sewing the cloth into an elaborate costume I simply draped it over her head and shoulders and pinned it to her forehead and throat (just below the bloody gash). The effect is a natural hood and robe-like arms. When you lay the cloth over the hands and wrist as shown, the clips on the ends of the lines going through the cloth to her hands will keep the robe in place. The best thing about this is that when she floats downward the fabric opens in the front revealing no body at all! Be sure to shred the bottom edge of the cheesecloth to give her a ravaged, tattered appearance.

Next we need to focus on the painting of her robe as well as face. I recommend doing the painting of the robe under the actual light she will be illuminated with, blacklight. The fluorescent paint you see her LIGHTLY dusted with is light green. Not apparent here is the white paint I used for intensifying the purple that white gives off under black light. Unless you are actually under the blacklight you can’t tell the balance needed between the two colors! For the face I recommend using normal lighting. The entire face as you see in the picture was done with black and then red (NOT UV) used for some blood effect on the gash and down the front of her chest. Fluorescent red doesn’t look anything like blood when under the UV light, so don’t bother even purchasing a can. The red with touches of black gives a curdled blood look under the blacklight and really adds to the effect.
Some important things;
1) Using anything other than cheesecloth for her robe such as a bed sheet or other less lightweight material will not only make her too heavy for the Dayton motor suggested as an alternative motor to the one shown in this build, but will ruin her ethereal effect. Cheesecloth is light and translucent, giving your lady a very spooky, ghostlike appearance that an opaque cloth could never give. Using bridal veil will not hang without sewing it into a costume BTW, and the natural effect you see here will more than likely not be attainable without considerable work. We have used this a couple of different times with no success.
2) Place a fan under her that is set on low and the fluffy cheesecloth wisps weightlessly in mid air.
3) Above and in front of her is the best place to position the blacklight.

A simple 18″ or 24″ tube will work, do not use incandescent “blacklight” bulbs as they do not work to filter the UV like true blacklight does. Make sure the light is fully hidden behind cloth or some other method that will keep any of the blacklight from shining on the viewer or the other items in her general area to suspend disbelief.
And you have it! Congratulations! Since the construction of this project became simple and lightweight, this has become the single most constructed animatronic in the haunt enthusiast community today. You can be sure your victims will be as thrilled with her as I was the first time I got to see her fly! Thanks Doug for the many inspirations on the forefather of this spooky event. See her in action