
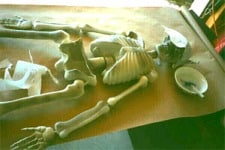
First we begin with one of the cheap skeletons from your local Pick n Save or Mac Frugals etc. We need to modify the body a little since for some reason these are not completely anatomically correct. Not that we will make it perfectly anatomically correct here, but we are going to help it along. You will need to use a Dremel tool or similar cylindrical cutting tool like a drill bit and cut out both eyes. Instead of eye balls this figure comes with a flat section instead.
Cut this out at the borders and then move on to the groin. The front of the pelvis for some unapparent reason is made here to puff out as if our skeleton is bone-fat. A real skeleton has no such physical anomaly. Cut the front of the swollen area out as shown in the pic. above. Inside the pelvis you need to fill with something for your “skin” to lay against. Use a block of craft foam from an art supply place. This photo shows a piece of paper covering the eyes. This is how we will be applying “skin” to our corpse, but we will get into that in the next page.

Next, you’ll need a mini blow-torch. These are pen-sized torches used in kitchens for browning foods. Use this to carefully smooth out the sharp edges left from cutting the plastic away from your body. Be very careful here. Burning plastic is extremely hazardous and will burn even when moist with water and is VERY hard to put out. Keep your flame away far enough to melt only. Once all these edges are smooth then we move on to the next step; filling the cavity of the groin.
Here you see the groin already filled in somewhat and covered. The filling we used is a green material called construction foam. This is used in floral arrangements and can be purchased at a Michaels or other craft store. Using a butcher knife cut a section that will fit in the area then glue into place with some contact cement. Then smooth the rough edges with a coarse sandpaper like #100 grit. Do not worry about filling in the eye sockets. We will be inserting eye balls into these cavities later.
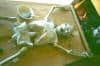
Next we begin applying skin. You will need to purchase a jar of Phlx glue. Shop around the craft stores and hobby stores by phone to locate it in your area before piling into the car and driving to town. It is not available in your local Quick Shop. This glue will need to be cut approximately 1/4 cup glue to 1 cup of water. Now you simply use one sheet of paper towel from the kitchen (preferably with no markings on them) and lay these on your corpse. Hold the piece in place and using a foam brush, brush on the Phlex glue mixture to wet the towel. You will need to tear some pieces in smaller, different shapes to work well, but don’t worry about this. If the “skin” overlaps, it won’t detract at all. Once wet, the towels are very workable. Cover the entire skeleton including the joints with the wet towels. When doing the skull push the towels inside the eye sockets far enough to accommodate a round eye ball. Here is a tip; be sure to position your corpse in the pose you will want, as he is NOT articulated.
When you are completed with this then start back on the other end that you first began and by now it should be dry enough to go over your skeleton again with a second layer of skin to reinforce his joints and durability. The reason we use the Phlex glue is because this is water soluble when wet but once dry it remains somewhat flexible for forgiveness in moving, yet is now impervious to moisture. A rare combination of traits. Now let your corpse dry overnight.
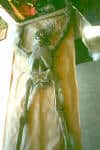
The next day you will apply a color to the old boy. By using a combination of brown and reds and blue (important color), you will be able to give your corpse a true rotten looking color. We used an air brush to apply our details to the face but I have to think that you could use a faster method like rattle can for the rest of the body. Just try to highlight the joints slightly with some red paint before going back over with the brown color. Done right, you will have a sickly looking blood-underneath the dried skin look. I drizzled some blood down from his mouth onto his face and chest as well. Next we go to the details.
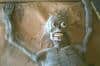
Here is a close up of the skull. I couldn’t find the correct size wood balls to make into the eyes, so I went with a larger size and wound up with a comical effect for my creep. But since I liked it anyway I decided to go with it. Use a small paintbrush to outline his gums and eye sockets. I find that a dark red looks pretty good. Paint inside the nasal cavity with a darker color like black with highlights of red and brown. Paint the teeth with off-white paint and you can also blacken out a tooth here and there for more trauma if you like. For eyeballs you can buy these from a number of places on the net, such as Bucky’s Boneyard or you can make them yourself using 3/4″ diameter wood balls used for doll eyes from a craft store. Paint them white and glue on a doll cornea and then paint on some red streaks with a fine brush. Then clear coat the entire ball and pop it into the socket.

Touch up the entire face before adding the hair. For this we use some white hair found on a 10 cent wig from the Goodwill or where ever. Spray the scalp with contact cement and place small amounts of the hair on while it is still tacky.
If you look closely the left hand was turned the wrong way before I put on the skin, so it looks like he has two right hands. I guess I could call him my right hand man….
I hope yours turned out nice! This guy hung in there with me for 6 years before all the wear and tear got to him and he was sent to that big haunt in the sky. Not a bad investment!
Rest In Pieces,