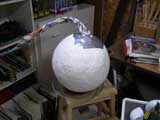
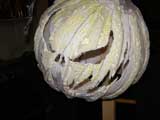
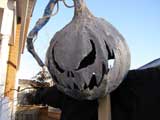
This is my first big paper mache prop and I’ve learned a lot so far – including a number of things not to do. The pumpkin started life as a 17″ inflatable beach ball which I covered in duct tape and then several layers of plaster wrap like they use for casts. This added a lot of strength which was needed as I had a problem with the duct tape pulling away from the plaster when I deflated the beach ball. So I cut a hole in the bottom and pulled out the ball and duct tape. This left a thin plaster shell that I reinforced with paper mache on the inside. I put in several layers of newspaper mache and then 2 layers made with heavy workshop paper towels. I didn’t measure precisely but my paper mache mix was probably 60% Weldbond white glue and 40% water.
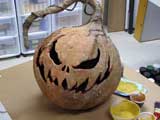
This ended up being incredibly strong, especially as the paper towels would soak up the mixture before hardening. To make the ridges on the pumpkin I drew guide lines and then sprayed lines of Great Stuff down the side of the pumpkin. Once cured I carved these to shape. The face was cut out with an xacto knife and then I started to apply Celluclay to fill out the form and add texture.
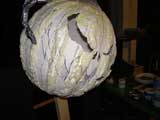
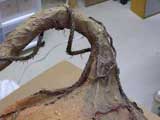
The stalk started as rolled up newspaper, them re-enforced with chicken wire, coat hanger wire and duct tape. I covered it with the paper towel paper paper mache and then added additional vines and roots using twine along with more Celluclay for texture and to build up the base of the stalk. One it’s all done I’ll seal it with a urethane spray and paint it with acrylic paints.


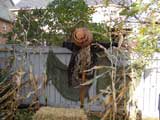
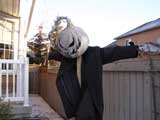
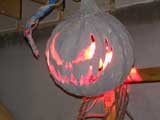
Here are a few shots I took when I set it up outside on the new post just to test the eventual look and feel of it. Looking good I think. One thing that came out of this test was that it really will need to be securely anchored as even the slight wind that day was enough to knock it down. I’ll have to give some thought to this. Sandbags maybe?
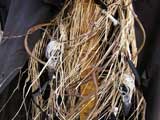
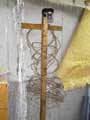
For the support I used a 2″ x 3″ post attached to a piece of 3/4″ plywood as a base. I added steel L-brackets to the base to secure the post. The four 12″ spikes shown will be driven into the ground to help anchor the post. I’ve also started to form the “body”. I’m using a grape vine wreath of the kind available at craft stores. I soaked it in water for a day or so to soften it up a bit and then gently unwound it a bit. It is hung over the cross piece and attached to the post at several points with Gorilla Glue and nails. I think it almost gives the feel of a crown of thorns or coiled barbed wire (hey, that’s an idea – I can add some of that fake rusty barbed wire to it. Cool!)
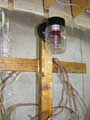
For a light I used a standard outdoor utility light attached to an extension cord. I don’t think the heat from the light will damage the pumpkin or create a fire hazard but I’ll be keeping a close eye on it Halloween night.
Warning: This prop requires 120V AC line voltage. Line voltage can kill! Please be careful and make sure you know what you are doing and that everything is hooked up properly.
Always concerned with storage I worked out a way to make the arms removable. There is a short cross piece of wood for the shoulders and then the arms themselves are made out of broom sticks. To make them removable I used utility hangers mounted to the back of the cross piece. These are friction fit hangers so to mount the arms I just slide the broomstick through the sleeves of the coat and snap them into the hangers. For storage they come out just as easily. With the head and arms removed the body on the post will take up minimal space.


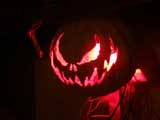
Below are a few test shots that give a hint as to what the scarecrow will look like once it’s all finished a lit up on Halloween night. I’m pretty happy as to how it’s turning out – the red light really looks like all the fires of hell are burning inside!

Painting Step-by-Step:
Here are the sequence of steps I took in painting the pumpkin. I didn’t really have a plan or anything – it just sort of happened. Some things worked out better than others and there were a few things I would do differently next time but in the end I think it turned out OK.
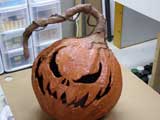
I started with an orange base coat over the entire pumpkin including the stalk. I used a Kryon brand spray-paint in a glossy bright orange colour – appropriately called Pumpkin. It turned out a bit bright and garish but I figured the tough exterior paint would help in sealing it to the elements. I should also mention that prior to painting I gave it several all-over coats of spray urethane to seal the mache.
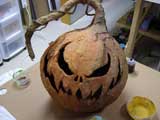
I next masked off the body of the pumpking against over-spray and gave the stalk a coat of flat military brown. I then removed the mask (an old towel) and carefully sprayed from the stalk down onto the body of the pumpkin to blend the colours together and make it look like the pumpking was growing out of the stalk rather than having a definite hard line between brown and orange. More organic looking I thought. I finished this step by going in with a brush and painting the individual vines/roots a darker brown on both the stalk and pumpkin to make them stand out more. At this stage I also painted the inside black.


Unfortunately there is a step missing here as I forgot to take a photo before going on to the next stage however, you can see the effect in the photos below as well. What I did next was to dry brush a yellow ochre colour over the whole pumpkin and even up onto the stalk. This toned down the bright glossy orange of the spray enamel and started to bring out the detail. I could have easily stopped at this point as it was looking pretty good but I wanted to bring out more of the detail by emphasizing the shadows. This was were I messed up. I used a mixture of rubbing alcohol and a few drops of black leather dye to produce a dark wash which I stated to apply over the pumpkin. The idea was that it would fill the crevices & depressions but it somehow reacted with the existing paint and really changed the colour overall. It now looked more of a sickly yellow/green than orange. Luckily I had stated on the back and was working my way around so that by the time I came to the front it had started to dry an I realized my mistake.
After calming myself down I thought it looked not too bad in that it sort of looked like a cast shadow on one side of the pumpking. I then mixed up some lighter yellow/orange and proceeded to again dry brush the whole pumpking with an eye to blending the transition between the light & dark halves. The final stage was to dry brush a light cream colour (pure white would look too harsh) over the whole pumpkin & stalk to bring out the details and make them “pop”. This is to make up for the lower light levels on Halloween night. The effect is (and should be) subtle but really helps in the overall look. This stage can be seen in the last of the 3 photos below.
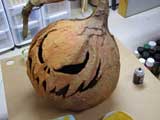
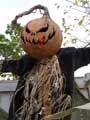
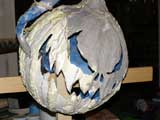
Here are three close-up shots of the completed pumpkin showing the colour blending and details. Not exactly what I had in mind but it works. Now to pull it all together and finish the body.
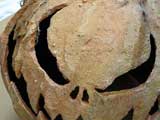
One other thing I forgot to mention that can be seen in the photos below is that although the plaster/paper mache shell was strong it was also unrealistically thin. In order to give it depth and make it look more like a real pumpkin I built up the edges of the cut out face on the inside with more Celluclay to give it the appearance of a thicker skin

The Finished Scarecrow:
Here are photos of the completed scarecrow as he appeared on Halloween. I had finished off the coat by distressing/ripping it heavily and weathering it with brown spray paint. The body was filled out with sisal and corn stalk leaves. I also found the coolest garland of resin crow skulls, feathers and bones. I added this to the scarecrow as I thought it looked like a very black magic, voodoo sort of thing. Fake rusted barbwire wraped around the arms finished off the detailing. I planted a dozen cornstalks (next year I’ll get triple that amount!) and had a haybail in front to hide the base and lights. At night with the red light burning inside he looked super creepy!