
First I cut out all the “extra” plastic to make the skelly look more like a human instead of a mutated alien. Then, a little tip that I got from TS books, (great books – buy them!!) I got out some of those white stretchy cobwebs and CUT them into little sections. The reason I cut them is because if you try to tear them, they get real stringy, and if you cut them, they separate nice and loosely. Then I got a small dish and filled it with latex paint (a little trick I learned on MOM) instead of the usual and highly expensive liquid latex! Then I dipped the small pieces of cobweb into it and totally soaked it. After I pulled it out and it was done dripping, I stretched it and put it on the skeleton body. I continued with this until I achieved a desired effect. Then, WAIT! I would let it dry about 3 days before the next step – AT LEAST!
Then, I did bust out the liquid latex (only used a small amount) and smeared some on over top of the “flesh” parts) This gives a glossy surface for the finish to go over creating a wet and disgusting look!!
Finally, probably the easiest and most rewarding part of the project was the finishing. The ONLY thing I used was a small amount of Mahogony (I think that was the color) wood finish. No airbrushing, no detail painting! I just slapped the first coat on (literally slapped – you should see my basement floor!) then put a few more dabs on the “MEATY” parts, and that was IT!! Let dry for about 3 days and you got a real cheap corpse! For an even grosser effect – I didn’t do this on mine – spray some gloss enamel over it and then some more wood stain – REALLY WET AND SICK look!
A few other pointers – If you look closely at my pics, I left the top arm bone on, but took the lower arm bone off. Yea I know, real technical – HA! To make the lower arm, I combined some other people’s ideas and made them all work together. I made a wire armature – very quickly, not detailed – based off a medical book. Then I used a combination of paper and masking tape built up to form the bones and rotting fingers and knuckles. I then just corpsed it like mentioned above. This helped tremendously, because in an arm, there are two bones, not one in your lower arm – the attention to detail really stood out and I highly recommend that step. OR, for a quicker alternative, you could just cut out the middle section of the lower arm and masking tape it up.
Finally for the skull…Now I must admit, I did cheat a bit with it, but lets call it time management!! A while ago I purchased a pretty realistic foam filled latex skull and I decided that I wanted something similar to corpse. So, not using any common sense, I first thought of making a clay replica and making a mold. Then, I got smart and decided to just use the bought skull to make a mold.
I sat the skull down (it had a flat bottom) on a piece of plywood and secured it with some hot glue. Then I smeared liquid hand soap over the whole skull lightly with a brush. Then I made a piece of clay that was about 2 inches high and 1/2 in thick and made a divider wall to split the front half from the back half. Then, sticking with my penny pinching methods, I bought 4 tubes of home repair 100% SILICONE caulking. I then smeared that into every nook and cranny until it was about 1/2 in thick all the way around. Then I put plaster of paris over top of that.
Next I removed the clay divider and repeated the process on the other side. When dry, I had 2 separate pieces that, when put together, formed a skull mold. Buy some great stuff foam, spray it in and let it dry. Pull the 2 halves apart and you got a realistic looking skull that’s ready for the corpsing process. And really cheap, I might add!!
Make good looking, cheap foam skulls

This is just the bought version of the foam filled latex skull that I casted. I chose this instead of a bucky skull because it isn’t near as detailed, doesn’t have any undercuts, has a flat bottom, and still looks pretty cool.
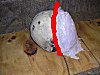
Here you can see the first layer of silicone on the face. Before this was applied, I put a light layer of handsoap on the face to make it easier to take off. The red is where the clay divider was. It is about 1/2 in. thick.

The second layer is plaster that is poured and smeared over the silicone. This will allow the silicone to hold its shape while making a mold.
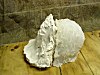
Here is the first layer on the back of the skull after the clay divider is removed (the red should have been on the last pic as well, I guess I got lazy.) It is silicone just like I put on the front. The next step, (no pic) is to just put the plaster on the back like I did to the front. Separate the two halves, let dry fully, reconnect, and squirt about 3/4 full of great stuff.
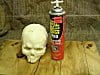
This is just a picture of the foam I used (Great Stuff) and a picture of the finished product.
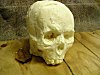
Just another shot of the unpainted finished skull ready for the corpsification process or anything else your sick and twisted heart desires!!