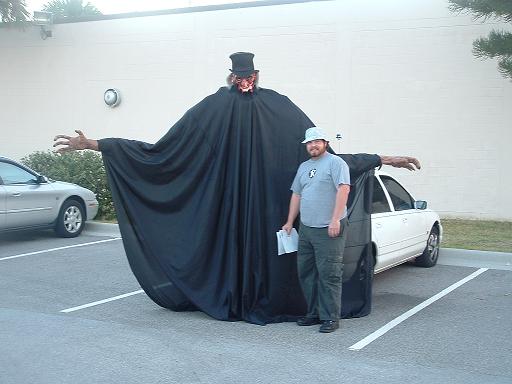
Construction is fairly simple. See below for the pictures.
Supply List
- A good hiking backpack with a bar that runs up behind the head.
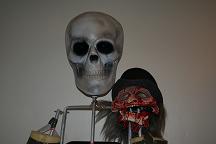
- Find one of those plastic hollow skulls. Make sure it has a solid base and is life-size so that your mask will fit. The light-up yard decorating ones are good. Get some weights because you will need to make it heavier in front so tilting the head is easier.
- Eighteen yards of black fabric. Cut into three strips six yards long and sew together to make the robe.
- Two pieces of 5/8″ hollow aluminum tubing, six feet long each. For the arms.
- One piece of 5/8″ aluminum tubing, three feet long. For the neck. You can cut to fit later.
- One piece of 3/4″ aluminum tubing, six feet long. For the shoulders.
- Two BMX bicycle grips.
- Eight small eye-bolts for connecting the shoulders and elbows. Make sure that they are long enough to mount through the aluminum tubing.
- One large eye-bolt that has a big enough hole to allow the neck tube to fit inside.
- A helmet with a strong chin-strap and extra clearance above the top of the head inside. (you don’t want any bolts poking the top of your head.) I used a plastic, military style helmet.
- A couple of small cabinet hinges. Not the square or rectangular type. Get the ones that look like small wings.
- Some hose clamps that will fit around the tubing.
- Four U-bolts for connecting the shoulder tubing to the backpack, two on each side. Or, you can just drill holes and bolt the whole thing together normally.
- A bunch of tie-wraps for holding things temporarily while you construct the costume.
- A metal coat-hanger. To control the head.
- Duct tape is handy.
- Silicone glue. To mount the BMX handles to the control poles.
- Some pillow foam padding for the arms, shoulder and chest.
- A mask and creature-reacher hands.
- Small eye-hooks for connecting the coat hanger wire to the helmet and head.
Construction Guide
- Cut the two 5/8″ poles in half. Take two of the pieces and bend 90 degrees about six inches from one end only. these will be your handles. Glue the BMX handles here.
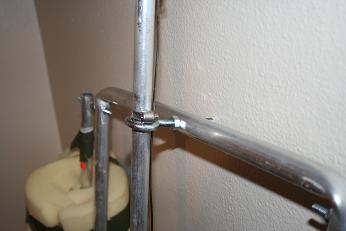
- Take the 3/4″ tubing and make two bends so that it matches the width of the backpack frame. This will extend the height. The two bends become the shoulders.
- Drill holes through the 3/4″ tubing about 3/4″ below the shoulder bends and mount two eye-bolts.
- Using the two 5/8″ pieces WITHOUT the BMX handles, drill holes about 3/4″ from the ends. Mount eye-bolts at each end facing opposite directions. Open the eye-bolts and connect to the shoulder eye-bolts and crimp closed again.
- Using the two 5/8″ pieces with the BMX handles, drill holes about 2″ from the bend; this will give you a little extra leverage for raising the hands. Mount the eye-bolts with the holes pointing towards the body.
- Connect the handle eye-bolts to the arm eye-bolts and crimp closed.
- Bolt the 3/4″ tube to the backpack and adjust it for the height you like. The backpack I have also extends and I raised it up all the way. This completes construction of the arms. Test it out and adjust as you like.
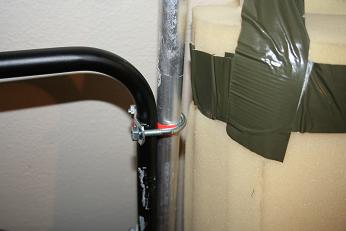
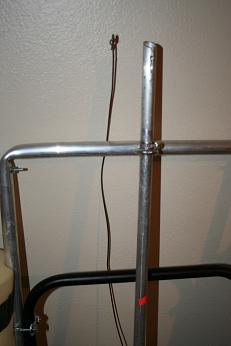
- Mount the large eye-bolt at the center of the top rail between the shoulders. The hole must face forwards. This will support the neck tube and head.
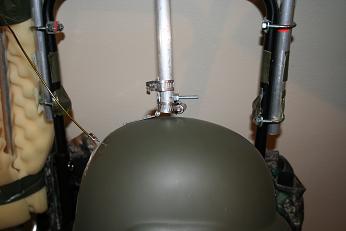
- Mount a hinge on the top of the helmet so that the neck pole is in front. Mount another hinge on the skull so the neck pole is in the back. This is important to allow good head movement.
- Connect the last piece of 5/8″ tube to the top of the helmet in front of the hinge and secure with either hose clamps or small bolts. Then slide the pole up through the neck eye-bolt.
- Put the costume on and have someone place a hose clamp on the neck pole just above the large eye-bolt. This will keep the weight of the head off the helmet and allow the pole rotate left and right. Cut the neck pole off so that you costume head is at the level above the shoulder you like.
- Mount the head on the top of the neck pole. Make sure the pole is behind the hinge.
- Connect the coat hanger wire at the back of the helmet about 3″ from the hinge with a small eye-hook.
- Crimp the ends closed. While facing straight, have someone cut the top of the wire and connect it at the base of the skull about 3″ behind the hinge. Crimp the ends closed. The wire will be running behind the shoulder tubing.
- The frame is now completed!
- Mount the creature reacher hands and secure to arm poles. I left the plastic poles in the hands and used hose clamps and glue.
- Pad the arms, shoulders and chest as you like to fill out the costume. Make sure to not interfere with the head/neck motion.
- If you weighted the head right, it will tilt forward almost on its own when you tilt your head. You just use the coat hanger wire to tilt it back up with the helmet.
- Put the robe on and apply any finishing touches you like. Be careful if you alter the robe to make sleeves. I messed up my first time and did not allow enough room to control the arms.
HAPPY STALKING!