
Video clip shows the box and its internals in action.
They say necessity is the mother of invention. In my case, it was lack of ability. I saw the instructions for cannibalizing movement sensors and constructing motorized linkages and figured I wouldn’t have a monster-in-the-box this year. But in a flash of desperation I came up with a more expensive but easy method of achieving it. This project can be done in a couple of hours, making it a great last minute project.

The Parts
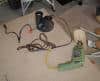
The picture above shows the key parts…all except the box, a extension cord and some nuts, bolts and washers.
The drill is an old electric drill I had lying around since before the cordless one I now use. I’m sure you can get one for pretty cheap.
The motion-activated lights are the cheapest ones I could find and they have a switch that allows it to run for 1,4,20 minutes when activated.
The parts in the plastic, screw into a light socket and have a standard plug on the end. We will use them instead of lights in the motion-activated system.
Wiring It Up
WiringTrue to my abilities, wiring the system is is pretty easy. Unfortunately the motion-activated lights didn’t come with a plug for plugging into the wall, just 2 wires. So I took a cheap extension cord and cut off the end, then connected the wires to the light. You can see in the picture.
Next we screw the plugs into the light sockets. In my case the plug on the end of the screwdriver was amazingly short – have you ever seen one like that? so I had to use another extension cord to connect them.
And thats the sum total of the wiring scheme!
Connecting the Box
The trickiest part of this is connecting the box to the drill.
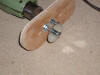
Connections Once again, I went with something within my abilities. I took a junk piece of wood and drilled 2 holes in it!
Once hole has a long bolt and a couple of washers and 3 nuts so I can tighten the nuts and they won’t unscrew – this is a key item, my first design had just one nut and it unscrewed after a couple minutes of work. Unfortunately you can’t see them in the picture, but its all tightened down so when the drill turns the wood will spin as well.
Then a second hole has a bolt going the other direction, and some LARGE washers. I found some 2 inch washers and used them so the cardboard wouldn’t tear. The trick is the bolt must turn freely around the wood but be tight to the box. This is the ONLY tricky part of this and its not too bad. I just drilled an extra big hole in the wood and used several nuts locked and epoxyed together so the bolt would turn easily but be locked to the box.
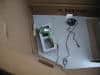
The picture at left shows the concepts. I cut off the bottom of the box except for one flap and placed some concrete blocks on it to keep the box from moving around, but this also gives a hinge joint so the box can move.
I’ve cut a small hole in the box where the sensor sticks out to recognize movement. Then its the matter of bolting the box to the wood/drill assembly. Notice the high tech method of getting the drill to work, I used a cable-tie to hold the trigger on and cable-ties to hold the drill itself to a concrete block so it wouldn’t move around.
I have also received the following update from a fellow haunter (thanks Joe & Donna), they wrote:
We had a gag that used a variable speed drill and after about two hours we started experiencing the same problem. I am the “mechanic” of our show here, so the fix was one that was so simple we never thought of it during construction. A quick trip to the Auto Zone down the street and 2 bucks solved the problem. Radiator Hose Clamp. Just slide it up the cord to the trigger and adjust it down to the speed you desire with a screwdriver.
The picture at left also shows a couple of problems I had. The box must be strong enough not to flex too much, notice how the box has an extra bend and so the end has turned in, hitting the wood piece. If you look closely you an see that the bolt has unscrewed itself and is causing the wood to be twisted. This I fixed by using multiple bolts.
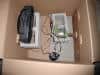
This picture shows the replacement box ( a bit smaller) and the final touch, a small tape player with a loop tape (“play” button held down) of monster growls. it also shows the connection when its OK.
So there you have it, a pretty simple “Monster In The Box”. I hope you enjoy it as much as I expect to this Halloween.
For those of you with a fast internet connection.
UPDATE:
I did have some problems with the connection between the drill and the box. I should have epoxyed the bolts but my epoxy was gone and I never did, thus the bolts tended to come undone. By two years later I decided it needed a complete replacement. The new connection is much simpler and worked flawlessly. Its in 2 parts, a bent rod and washers
The part that went into the drill was replaced by a simple bent wire. I went to the hardware store and got a fairly heavy steel rod, I was originally going to use a coat hanger but I felt it was probably a bit to flimsy so I got something heaver.
For the connection to the box itself, since I was just using a bent rod I needed a simple hole. I was afraid if I just poked a hole in the box it would tear after being in use. So I took two large washers, drilled matching holes through them and bolted them together with the box in between, then the hole is poked through the box and the washers will prevent it from getting larger.

