
Or, How Not to Build a Spinning Tunnel
Due to overwhelming requests (ok, only one) from the members of the Halloween-l mailing list, I’ve posted instructions and pictures from my vortex spinning tunnel.
I’ve been decorating the yard for Halloween since I was in Junior High School, some 30 year ago. This year, I convinced my family to attempt a walk-through attraction through our back yard. Professor Time’s Nightmare was born.
I had some “professional” experience in haunted attractions when I was running the Entertainment Department at Paramount’s Great America theme park in Santa Clara, California. We had the opportunity to borrow an “Elm Street” model haunted attraction from our sister park in Toronto. Our marketing people saw it in operation in Toronto, but wanted to take it up a notch. Of course, when this opportunity arose, I jumped at the chance.
We bought several props at the Transworld Halloween and Party show to improve the attraction. One of them was EffectTech’s Black Hole. This is the Spinning Tunnel you are probably most familiar with.
When it arrived at the loading dock, I was in shock. The entire thing fit on one pallet. I was sure there were many more shipments. The only thing that was missing was the two steel I-Beams that make up the bridge. They arrived the next day.
What follows is my attempt to re-create the effect. While the final version was quite successful, there were a lot of failures along the way. Hopefully, this will help anyone who wants to build a spinning tunnel by learning from my mistakes.
How Not to Build A Spinning Tunnel
First of all, everything on this site is for information only. In no way does the author make any claims as to the safety, reliability or engineering of any of the items on this site. It is the responsibility of anyone attempting the project to ensure the safe construction and operation of the attraction.
Safety needs to be the primary concern of this project. There are moving parts, and some of these are quite large. Guests will be traveling through this moving tunnel. Every effort needs to be made to ensure the safety of the guest.
This version of a spinning tunnel consists of several elements:
The Framework
The framework is the base of the structure. It was made from Unistrut brand metal framing channel. Go to www.unistrut.com for more details. This is an industrial channel that is great for making all kinds of things. The framework holds six BMX style bicycle wheels (minus the tire) that the tunnel rests on. One of the wheels is connected to a gearmotor via a belt and pulley.
The Tunnel
This is the main element. The tunnel is constructed of three rings that are connected by four rods, creating a cylinder. Think of a coffee can resting on its side. The each of the rings rests in two of the BMX wheels. Because there is no direct connection between the tunnel and the motor, if anyone were to fall into the tunnel, it would simply stop spinning. You can actually stop the tunnel with your hand. This will become clearer later. The framework of the tunnel is covered with fabric and painted with UV paints. Although I had purchased a lot of flame proofed cloth, I ran out of time this year and ended up using black plastic. Of course, I didn’t have a Fire Marshall to deal with.
The Bridge
The bridge is the hardest thing to engineer. Because it must span the entire tunnel, it must be beefy. You can’t run a brace from the middle or it would intercept the tunnel. The bridge is constructed of two platforms on either side of the tunnel, two I-beams stretched between the platforms, and a plywood walkway. In addition, hand rails are necessary. UV lights are placed along the side of the bridge to illuminate the tunnel.
That’s it!
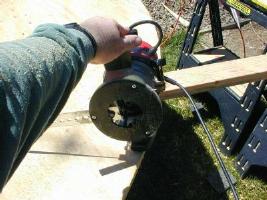
The original rings of the tunnel were made from 3/4 inch plywood. I made a circle cutter out of some metal stock and gerry-rigged it to my router. It is very important the the outside cut forms a perfect circle, since that is the edge that rests in the wheels. In this picture I made the rings 12 inches wide. This was unnecessary. I later cut them down to 6 inches.

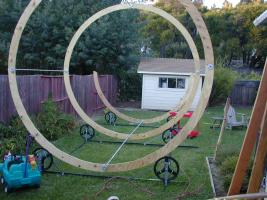
The picture below shows the first two rings completed and the third half way assembled. You can see the Unistrut frame and the BMX wheels in place. The BMX wheels are held in place with some L-shaped pre-drilled steel stock. There is a lot if weight on them, so they are braced to the inside with some steel strapping. You can see the rings are attached together with 1/2 inch galvanized pipe with floor flanges on each edge. I used additional flanges on the outside edge to protect the wood. Because my bridge is 20 feet long, the tunnel needed to be 19 feet long. The pipe comes in 10 foot lengths so I had to cut 6 inches off each piece (remember, there are two. 6 inches off each equals 12 inches. I didn’t remember this the first time). Of course if you cut off the end, you need to re-thread the end. That’s the second picture.
Then it rained. Wood warps in the rain. The rings were ruined. So I started over. This time I would use 1/2 galvanized pipe. I also decided that neither rain, nor snow, nor dead of night would stop be. So I bought a building to house the tunnel in. OK, which of you just said “This guys crazy”?

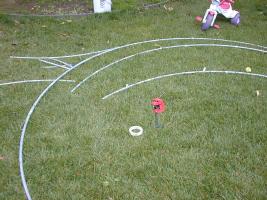
I started by trying to bend my own pipe with a pipe bender. That didn’t work. I couldn’t get the perfect roundness require. So I had the pipe bent at a fabricators. They would only bend 20 foot sections, so I had to recall my High School geometry and figure out the circumference of a 10 foot circle. 31.4 linear feet of pipe were needed. I wanted to be able to store this easily, so I cut the arcs into 7.85 foot sections by measuring a piece of string and using it to measure the outside of the pipe.

The quarter sections were attached together with a smaller diameter pipe bent at the same angle inserted inside the pipe. The cross pieces were attached with L-shaped and T-shaped hardware from the hardware store, but when I disassembled the unit I found that some had sheared. Next year I will make my own hardware.
The bridge is 2 20-foot sections of 4×4 I beams (note: do yourself a favor and paint these when you receive them. If you wait like I did you will spend hours scraping off rust before you can paint them. Here you can see the two platforms that the I-beams rest on. Stairs were later built to access the platforms. 3/4 inch plywood spanned the I-beams. 2×4 cross pieces were added between the beams at 4 foot intervals to increase strength.

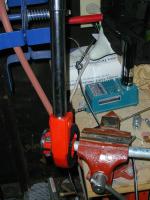
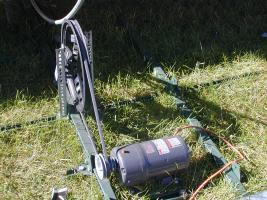
Here you can see the motor unit. The belt simply runs inside one of the BMX wheels. The pulley on the motor has 4 different sleeves to adjust the speed until the best is found. The motor is a 288RPM gearmotor from Grainger. Model # 2Z850. They’re at www.grainger.com. You have to own a business to buy from them, but it doesn’t take much. A business card will do.
I don’t have pictures of the tunnel in the daylight after the plastic was attached. I was able to attach the plastic to the outer rims with duct tape and it held fine. As I mentioned earlier, flame proofed material is the most desirable, but I ran out of time to sew the seams together in order to get a 20′ x 32′ piece. When I do accomplish this for next year I will install snaps on the rings and the material.
The plastic was splatter painted with 3 different colors of Wildfire UV paint. If you don’t know about Wildfire, you should. They make the most amazing UV products. Not cheap, but well worth the money.
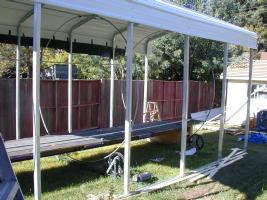
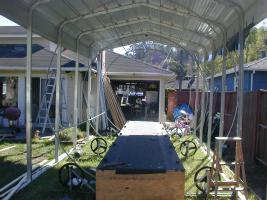
Here you can see the shed we got to cover the effect. I lined the side next to the fence with plastic, and the other side, which the guests traveled along, with plywood. In the second picture you can just make out the railing bases. See the enlargement below:

These are made by Speedrail and accept standard pipe. They were bolted through the plywood and into the I-beam and were very sturdy. That is an important factor, as people will lean on the rails. Hard.
I used three 18 inch UV fixtures on each side, which produces plenty of light.
That’s it. I spent more than I wanted to on this project, but we are going commercial this year, so I bought the quality needed to make things last for years.