
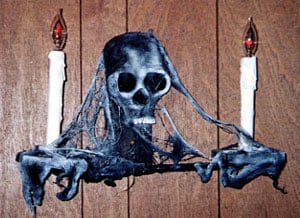
So, you want to liven up your haunt, but you don’t want to spend a lot of money. Boy have I got the ticket for you. Build some of these custom wall sconces and you’ll have instant spookiness for under 10 bucks a piece.
Step 1: Make Some Skulls
Yeah, I know these are kind of goofy looking, but they’re easy to make and once they’re painted, they look much better. Either make or buy some paper mache material. I bought a big pack of stuff from Michaels and made 15 skulls out of it, so these are fairly cheap. Just get a ball of the material about the size of a baseball or just a little larger. Plop it down on some tin foil or wax paper and start working on it. Kind of squish it down flat, then pull the bottom down to make the jaw area. Push your thumbs into the eye sockets and the nasal cavity. Get some extra and build up the ridge along the top and side of the eyes. Don’t worry if it looks goofy and overdone, you need to really exaggerate the eyes to make it look good. Get something flat and poke the indentations down for the teeth, then flatten them off. Let it dry for a few days until it’s very hard. Once it dries, you should be able to sand it, file it, and drill into it without any problem. They get really hard!
Step 2: Make The Base
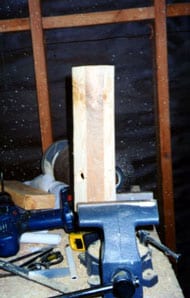
The bases are very easy to make. We made ours of a 2×4. We cut it at an angle on two sides to make it a little fancier. You can leave it flat, or get fancy with it.
Once you’ve got the base cut (we did ours about 12 inches long) grab your 7/8 inch spade bit and drill a couple of holes where you want the pipes to come out. Drill the holes through the board to the back so you can run the wires out.
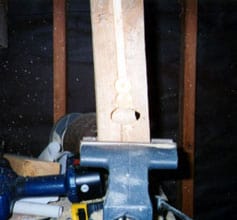
This is a picture of the back. You can see the holes near the bottom where the wires will come through. In addition, we drilled a couple of more holes above it, but not all the way through the board. These are just cavities to put the wire nuts in so they will be flush on a wall.

Cut a channel out of the back as well for the wires to run through. We just used a skill saw and then cleaned it up with a screwdriver. Use a router if you want it really clean.
Step 3: The light sockets
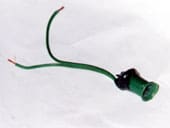
Now for the fun part. Go grab one of your old light sets from Christmas. You don’t need them anyway, Christmas is for sissies! Get the old C5-type lights. I think you can still buy them. They’re not the mini lights, but they’re not the big old grandpa lights either. They’re right in the middle. They should already be wired so that if one goes out, they don’t all go out. If you don’t have this kind, just find a lighting specialty shop around you, Home Depot may even carry them, and buy a couple of C5-sized light sockets.
OK, grab the string of lights and cut a couple off. Cut the wires on one side of the socket short and then tape them with electrical tape in opposite directions around the socket. Leave the other leads longer and strip them at the ends.
Step 4: The bendy bits

Assuming that you want to make yours just like we made ours, since they’re so cool looking, you’re going to need a couple of bendy bits. You’ll find these in the electrical department of your favorite home improvement store (as long as it’s not Lowe’s, I can’t find anything in there.) These are plastic conduit. They make these 90-degree 3/4-inch plastic pieces. Plus they are preformed with the open end which will fit the sockets perfectly!
Take your bendy bits and hot glue them into the holes in your base. Use lots of hot glue. If it drips, so much the better. Just make sure that you don’t inadvertently cap the ends of the bendy bits with all the hot glue. Had to learn this one the hard way. If you do, just grab a screwdriver and chew the glue out from the back. Doohh!
Step 5: Putting in the sockets

Now, take your socket with the long wire leads (you left them long enough to fit all the way down the bendy bit and out the back right?) Stuff them into the large end of the bendy bits and feed the wires down and out the back. If your leads aren’t long enough (another one we learned the hard way), just add some wire to them. Push the socket down until it’s flush with the top of the bendy bit. Take your hot glue gun and start gluing like crazy. Let the glue go between the socket and the PVC. Try not to get the glue into the socket or you’ll have to get it back out again. You may have to hold the socket straight until the glue sets up in a minute or two. The glue will be hot (Duh!) so use a screwdriver or something to hold it straight. (Another one I learned the hard way a couple of times.)
Once the sockets are in place, attach one lead from each socket together along with one lead from the lamp cord that you’ve cut the end off of ( the female end, not the male end). Do the same with the other. I prefer to use wire nuts to put them all together. It’s much safer than just electrical tape. Then tape the wire nuts, so they don’t come off.
Now your wiring is done! Easy huh?
Step 6: Finishing it up
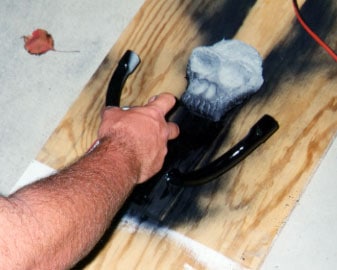
Take your paper mache skull and attach it to the base. I use hot glue and then put a couple of screws into it for good measure. Just about anything will work except for duct tape which will work – but it doesn’t look too good!
Now spray paint the entire thing flat black or any other dark color you like. Make sure you get in all the crevices. You don’t have to soak it, but give it a good coat.
Once that is dry, get some cotton webbing and some liquid latex. Dunk the webbing in the latex, stretch it out, and apply it to the sconce. Let it get all drippy and globbed together in places and then stretch it out in other places. Let it dry for about a day.
Once it’s dry, mix up some dark latex paint and some liquid latex together. Using a paintbrush, paint the entire piece front and back. make sure to get the thin parts of the web really well. This second coat strengthens the webbing quite a bit.
Finally, the last part is airbrushing. If you don’t own an airbrush, go buy one. You can’t achieve the results you get with an airbrush any other way. You should be able to pick one up for about 50 bucks. Either use canned air or get an air compressor (you’ll need one for all your pneumatic pop-ups anyway!) and finish up the detailing with the airbrush. Using just white and black (or whatever dark color you want) you can enhance the shadows and create highlights on the raised parts. Just experiment and see what looks good. The one tip I will give you on airbrushing is to try to paint the outside edge darker than the inside. Once I finish highlighting and shadowing, I just go around the edge of the piece and add just a little bit of black to it. It seems to frame it nicely and gives it a little more depth. Play with it. Have fun! You can always just paint it black again and start over if it doesn’t look good.
Once it is all dry get a couple of flicker bulbs (the candelabra style fit into the C5 sockets) and plug it in.