
Our haunt included a short hallway. It was dark, narrow and just screaming for a prop of some kind but at just about 4′ wide there wasn’t a lot of room to work with. What we came up with was the Whispering Walls – decrepid skulls and bones protruding from stone looking walls emitting vague, sinister whispering (click below to hear a sound clip of the whispers). The effect was subtle and eerie and provoked a number of positive responses.
Unfortunately no pictures were taken of the build process but the project is easy enough that an explanation and pictures of the final product should suffice.
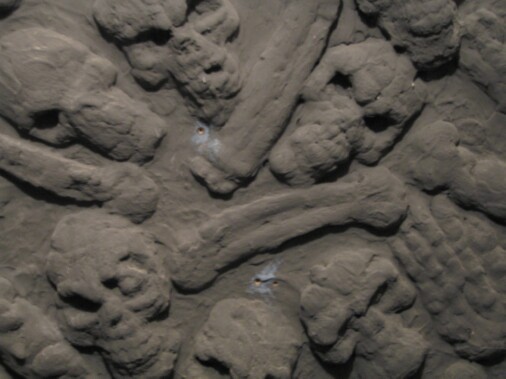
Begin by first making all of the skulls and bones you will need. These are made using Great Stuff foam (or a similar expanding foam) and take a fair amount of lead time to get ready due to the numbers needed and the curing time that must be allowed for each one. For each skull (or bone) we made a half mold of a hard plastic skull by firmly pushing the skull into a tray of slightly damp sand and filling the impression with foam. After a few hours the foam can be removed from the sand and the sand can be smoothed over and reused. Brush the loose sand from the foam skull but don’t worry about getting it all. The excess sand will not be noticed in the final product. Set the skull aside and let it cure for a couple of days. Once it is fully cured, use a foam cutter, knife or saw, to cut the back of the skull flat. Again set it aside and allow it to fully cure for a number of days. The foam will shrink as it cures and if it’s used too soon you will have lots of problems with cracking on your walls. The skulls and bones will be misshapen, pitted and ugly but look like old, decaying, slowly turning to dust bones in the walls.The number of skulls and bones you will need will depend on the size of your walls and how densely you want them packed. Each of our walls are 3’x2′ and contain about 15 skulls and 15 bones. This took us 3 cans of foam to achieve.
The next step is to prepare the speakers for the whispering. We purchased 20 surplus cell phone speakers. . We used 9 speakers for each panel. The speakers were connected 3 speakers in series and then connected 3 sets of speakers in parallel for each panel. The number of speakers you use is up to you but you want enough so that it seems that the sound is coming from all parts of the wall at once. Also, we decided that each of our two panels will be one side of the stereo output. This worked well for us since the panels were mounted facing each other only a few feet apart. You may want to wire the speakers so that you have both left and right stereo sides on the same panel or use a mono audio source.
Next comes assembly. You will need to cut a thin sheet of wood (1/8″ – 1/4″ thick) to the dimensions of the panels you are going to use (each of ours are 3’x2′). Now give some thought to how the panels will be mounted (they will be quite heavy when finished) and make any preperation needed. We mounted ours directly to limestone walls using 6 heavy screws and wall anchors for each panel. Arrange the speakers on the wood trying to cover the whole panel with equal spacing. Use a staple gun to fasten the wires and speakers to the wood and drill a small hole and pull the connection wires through to the back. Next arrange the skulls and bones on the panel and experiment with different patterns. When you are happy with the arrangement use a hot glue gun to tack the skulls and bones in place. Now mix up a batch of Monster Mud and completely cover each panel, the speakers and wires and the skulls and bones with a thick coat. You want to complete hide all of the speakers and wires and give the bones a nice petrified look but not completely obscure all the detail. Give the panel a few days to completely dry and then touch up any cracking.
)
For an audio source we bought a garage sale boom box. The headphone output was not powerful enough to power the speakers in the way we wanted so with a bit of hacking we disconnected the internal speakers and ran connecting wires from the existing speaker wires out through small holes drilled in the case. We used a sound editor to adjust the sound clips of the whispers and spliced a number of the clips together to form one long track (this minimizes the obviousness of the looping) and burned the track to a CD. The left output of the boom box was connected to one panel and the right output to the other. The boom box was set to loop and just left to play continually.
That’s it! A fairly cheap, easy way of adding additional ambiance to your haunt. We like the look and effect so much that we are considering doing a much larger version on a 6’x10′ wall with the bones and mud directly on the wall (fortunately our haunt has rough limestone walls) and adding dripping blood to the effect.
If this inspires you to build your own version please let us know. If you post pictures on the web we will be glad to link to your site.